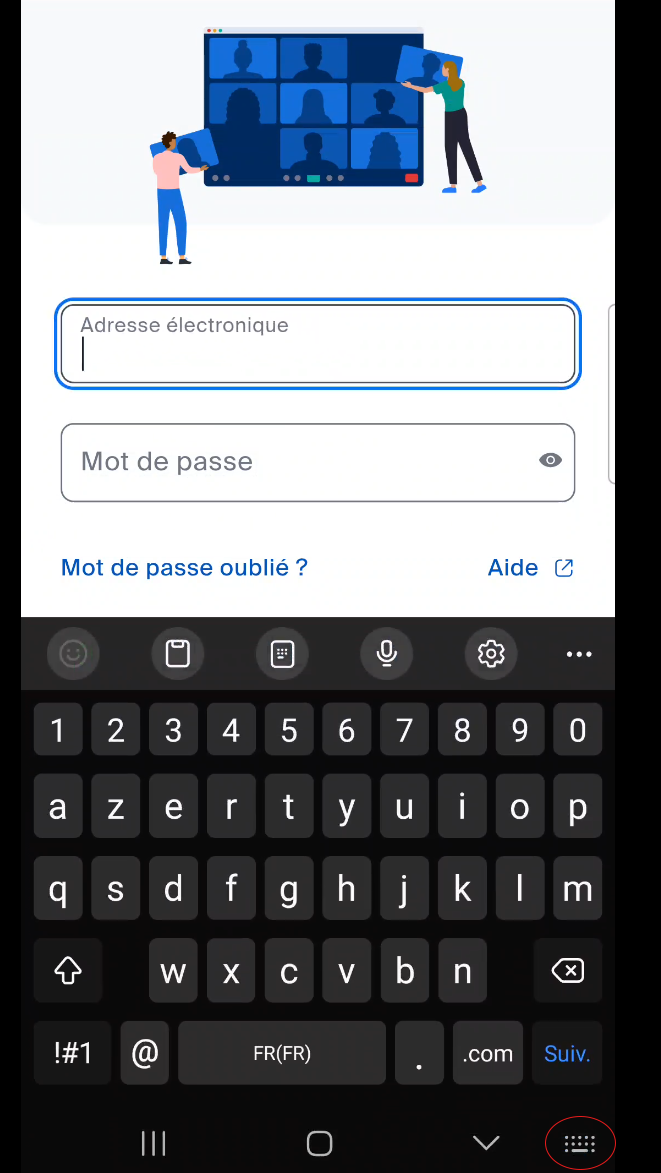
Access authentication, a key element in information system security management
Authentication of users, from simple users to administrators, represents an important element in managing the security of an information system. In practice, access to many digital services depends on the use of passwords, which remain one of the simplest and least costly means of controlling access and eventually proving identity. However, managing or defining these passwords can become laborious, and can even lead to system vulnerabilities. By way of example, a Verizon study in 2021 estimates that 81% of global data breach notifications are linked to password issues. Even worse, in France around 60% of the notifications received by there CNIL since the beginning of 2021 are related to hacking, and a large number could have been avoided by following good password practices.
The aim of this document is not to go into detail on the recommendations to be followed in order to develop the “best” authentication measures, but rather to provide you with a ready-to-use solution for setting up a password manager and, above all, to raise your understanding of how to use it.
Furthermore, we’ll take a brief look at some best-practice authentication strategies, but if you’d like to find out more, it’s highly advisable to turn to the ANSSI and CNIL resources on the subject. Below, for example, you’ll find two resources that are accessible in terms of content and easy to understand, particularly with regard to the associated applications:
What is a password manager? Why is it useful?
A password manager, also known as a password vault, is a virtual storage facility for login credentials, where all information is encrypted. In addition to pure storage, these solutions often enable you to automatically fill in login details for websites, or synchronize information on several devices at the same time, for example between two computers or even with smartphones. In addition, password creation is often facilitated by organizing passwords into groups and sub-groups, or by generating passwords to comply with associated recommendations and best practices. In practice, this often takes the form of a strong, human-memorized “master” password, which unlocks the entire password database (and thus access to associated resources). An alternative to this system, for example, is to use a password-protected office file. This solution is of course not to be preferred, as it does not provide the same level of protection as a password safe designed for this purpose. Finally, the use of a password manager is one of the recommendations made by ANSSI (n°31) concerning “multi-factor authentication and passwords”.
In this world of digital safe software, we’re going to find paid-for solutions such as NordPass or Bitwarden, but there is a very good free and open source solution KeePass, which has the advantage of being certified by the ANSSI in its version 2.10 portable.
In our proposal below, we’ll be using a little sidekick to KeePass, called KeePassXC, which is based on the KeePass architecture, but with the addition of the multi-platform component. More specifically, there’s nothing fundamentally wrong with using KeePass, however, it’s developed in C# and therefore requires Microsoft’s .NET platform, whereas KeePassXC is developed in C++ and runs natively on Linux, macOS and Windows, enabling the best possible integration.
To conclude this section, and above all to give some of our more advanced users a deeper insight into the choice of:
- KeePassXC does not support KeePass plugins. This isn’t necessarily a bad thing, as plugins can be dangerous, and KeePassXC already provides many features that require third-party plugins in KeePass, so for most things you should never need them.
- As a little bonus, even though it’s security that’s important, KeePassXC’s interface looks great and is more pleasant to use than KeePass.
- KeePassXC is natively available in French.
- If you want to see for yourself, the KeePass database file is perfectly compatible with KeePassXC (and vice versa). So you can switch from one system to the other without losing your data.
1 - KeePassXC setup and configuration
1.1 - Requirements and framework of the procedure
For this procedure we will have the following objectives:
- installing and configuring KeePassXC correctly
- quick overview of how to use the software
- install and configure an extension to link our password manager to my browser for semi-automatic filling of website passwords
- set up synchronization between two computers and an Android smartphone
- installation of an Android KeePass application
IMPORTANT: setting up one or more synchronization processes should not be considered as a backup procedure, and should never replace a dedicated backup of your database with your personal data. For example, if a problem occurs with a database on one device, synchronization with other devices will propagate the problem.
If you need help, you’ll also find a comprehensive documentation package at link.
| Operating system | Functional procedure | Edition and version |
|---|---|---|
| Windows | Yes | 11 Professional, version 24H2 |
| Mac | Untested | |
| Linux | Yes | Ubuntu 24.04.2 LTS |
| Android | Yes | Version 13 & 15 |
| iOS | Untested |
Table 1: Procedure test status.
1.2 - Downloading and installing KeePassXC
1.2.1 - For Microsoft Windows
Go to the download page on the official website via the following link and download the msi archive. Follow the usual installation steps, making sure you run the installation in administrator mode (if necessary, right-click on the executable and click on “Run as administrator”). If you’ve done this correctly, you should get a window like the one in figure 1. You can check the “Create a shortcut on the desktop” box, which will place a launch shortcut on your desktop.
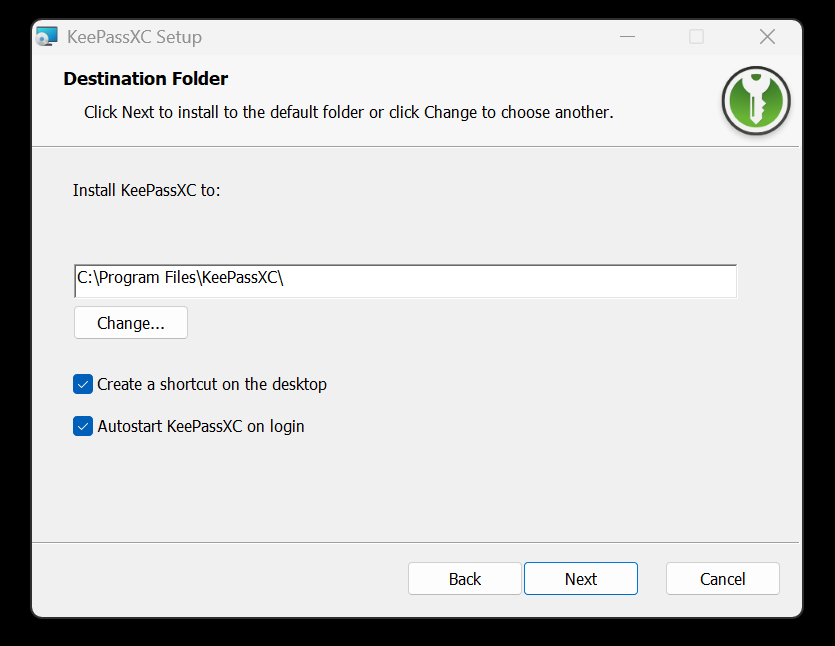
If the default installation path points to something like “C:\Users\nom_user”, you have not launched the installation with administrator rights.
Note that for some users, the software won’t launch after installation, even if you click on the run shortcut. To remedy this, you need to install the latest Microsoft Visual C++ libraries. These can be found at next.
1.2.2 - Linux
Simply download the KeepPassXC AppImage for Linux from official link and install it on your system.
1.2.3 - For macOS systems
For macOS systems, download the dmg image from the [official] link (https://keepassxc.org/download/#macos){.external target=“_blank”} and install the software in your applications.
1.2.4 - Initial configuration and creation of your password database
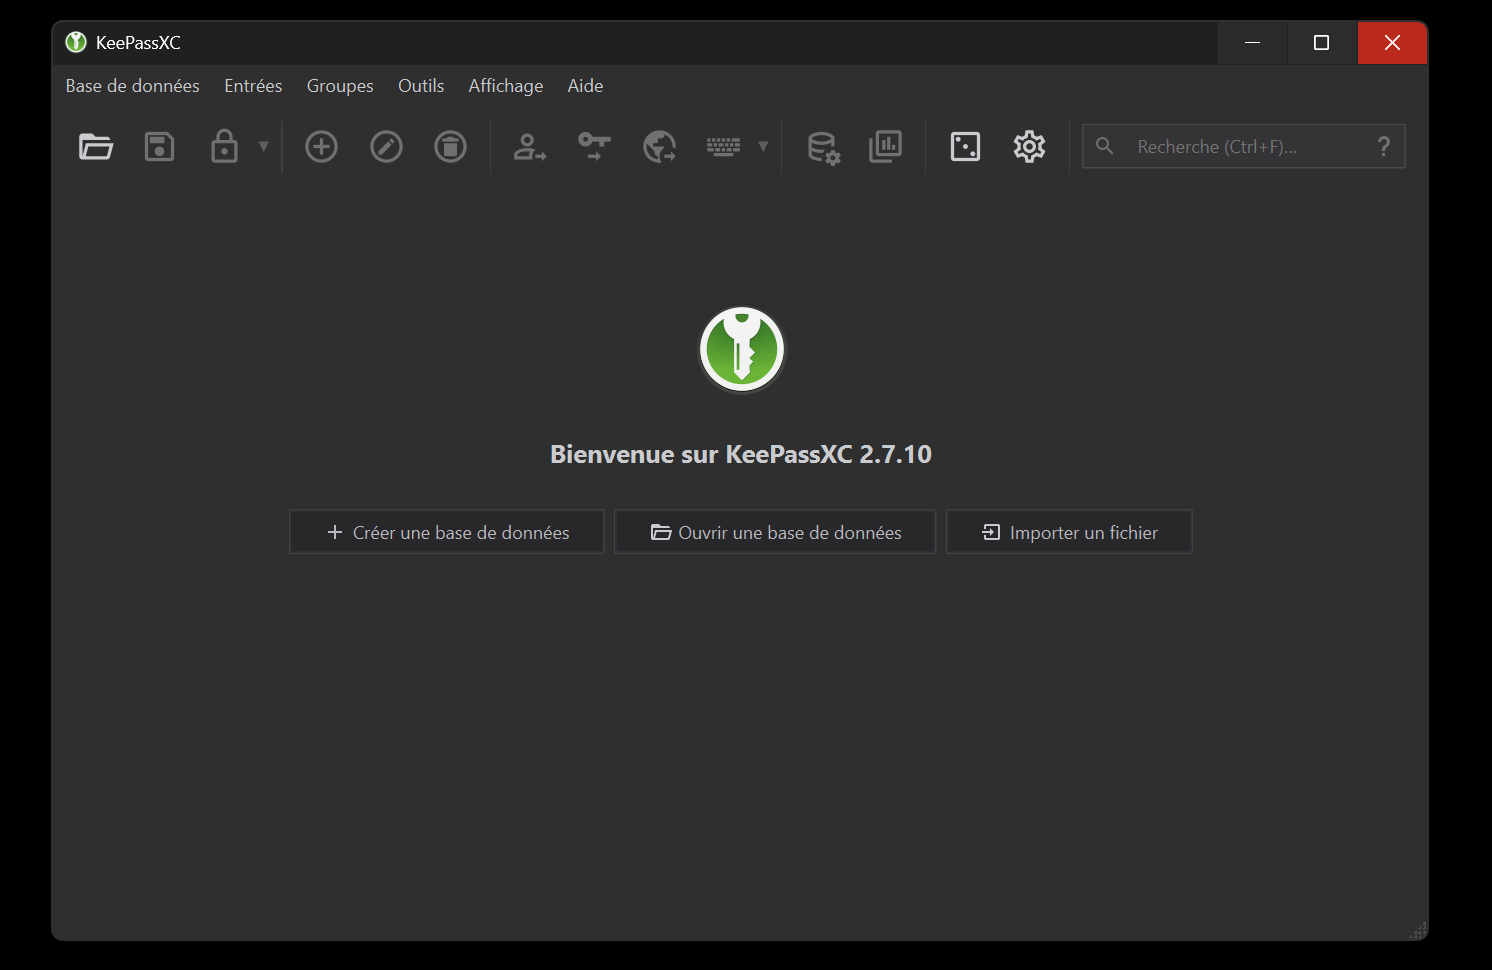
Now that the application is correctly installed on your system, you should come across a welcome window like the figure 2.
By default, the application language is set to the system language. In line with my current configuration, future screenshots will be in French.
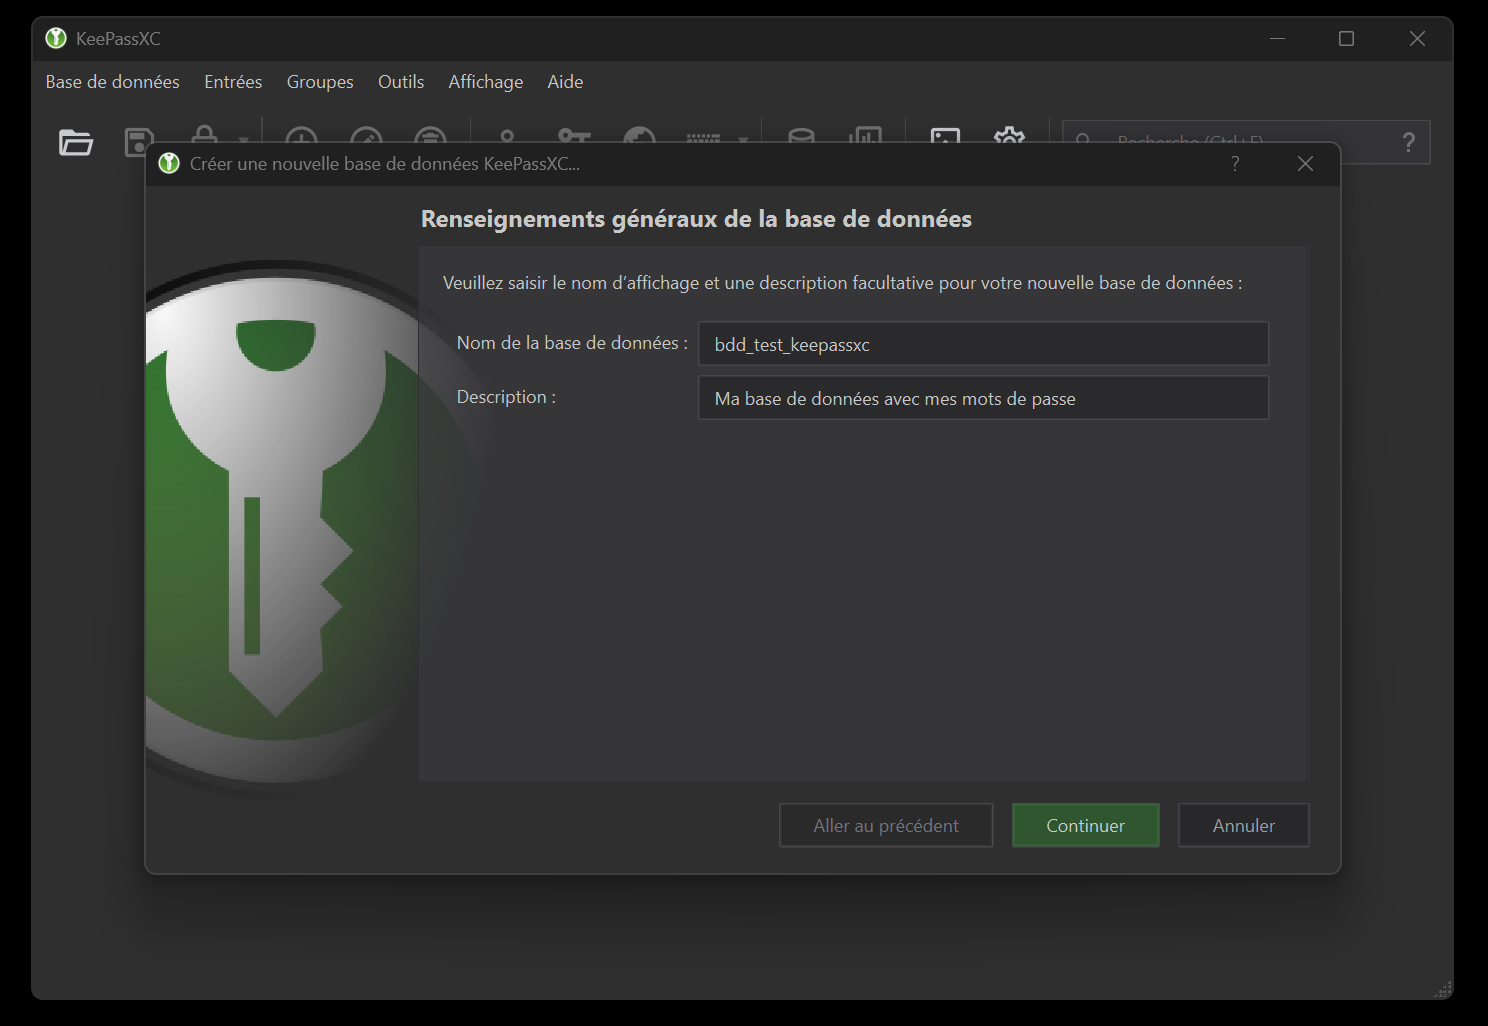
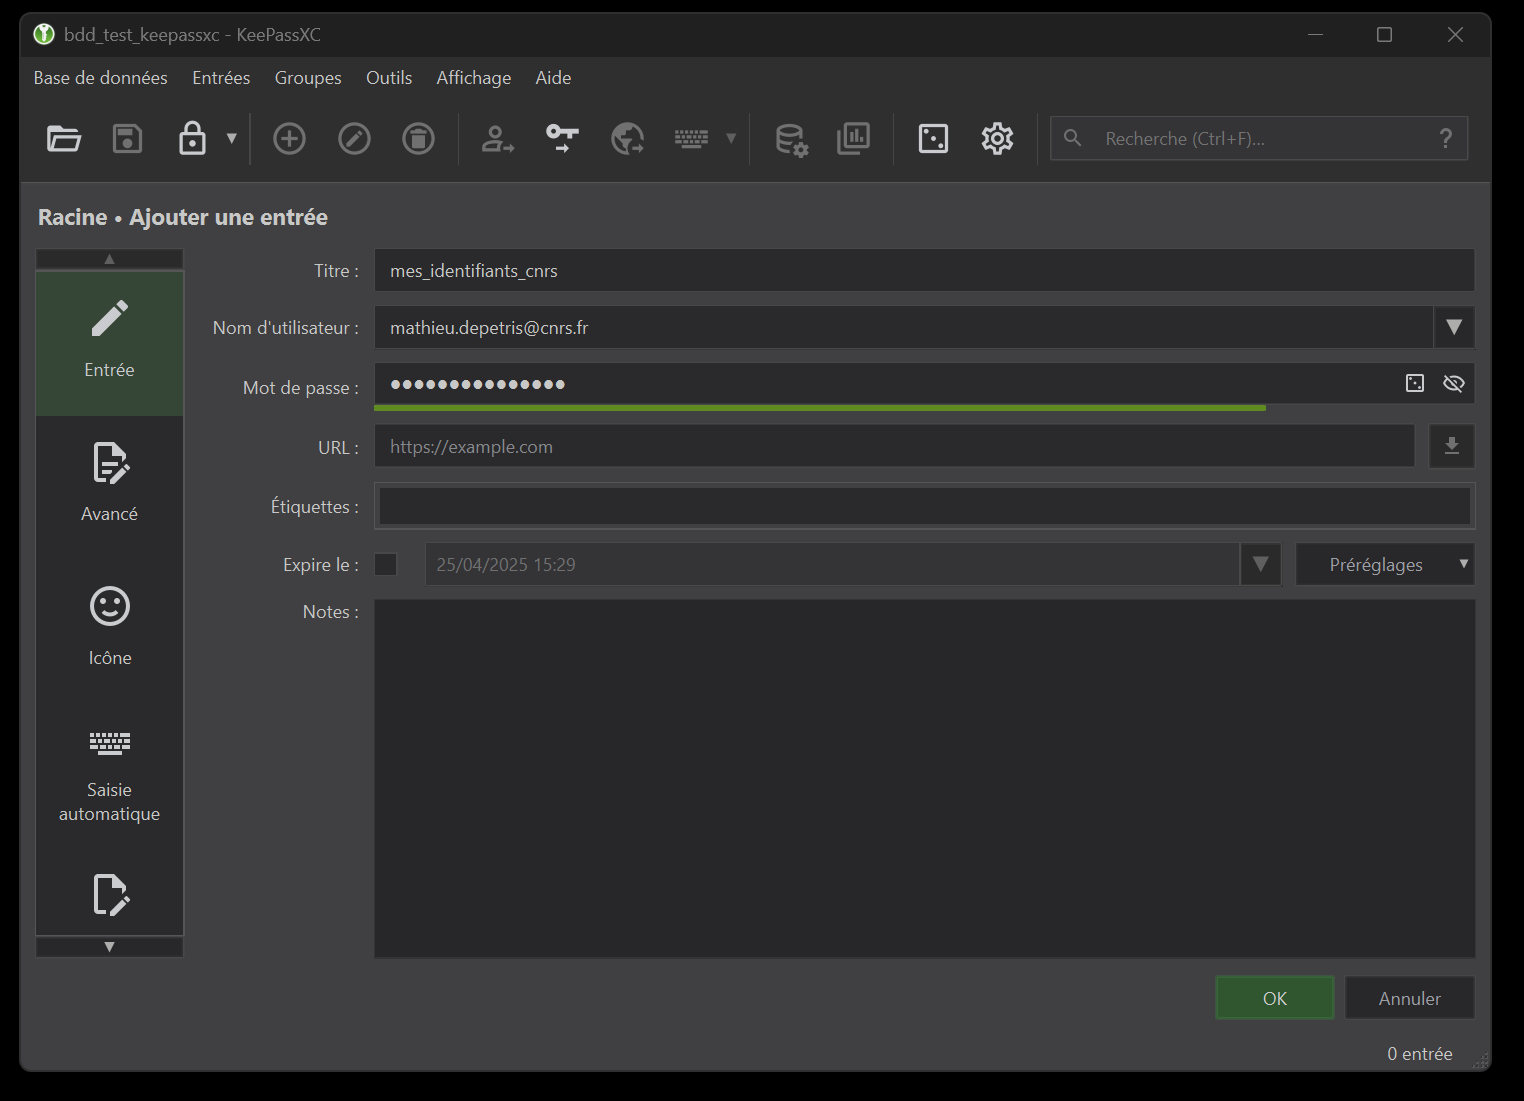
Now we’re going to create our database file, which will contain all our passwords. To do this, simply click on the “Create database” tab. The next window will prompt you to give this database a name. This database will take the form of a .kdbx file stored on our hard disk. To avoid any compatibility problems, use a name with a special character (no accent or space). Here, for the example, my database will be called “bdd_test_keepassxc” (figure 3).
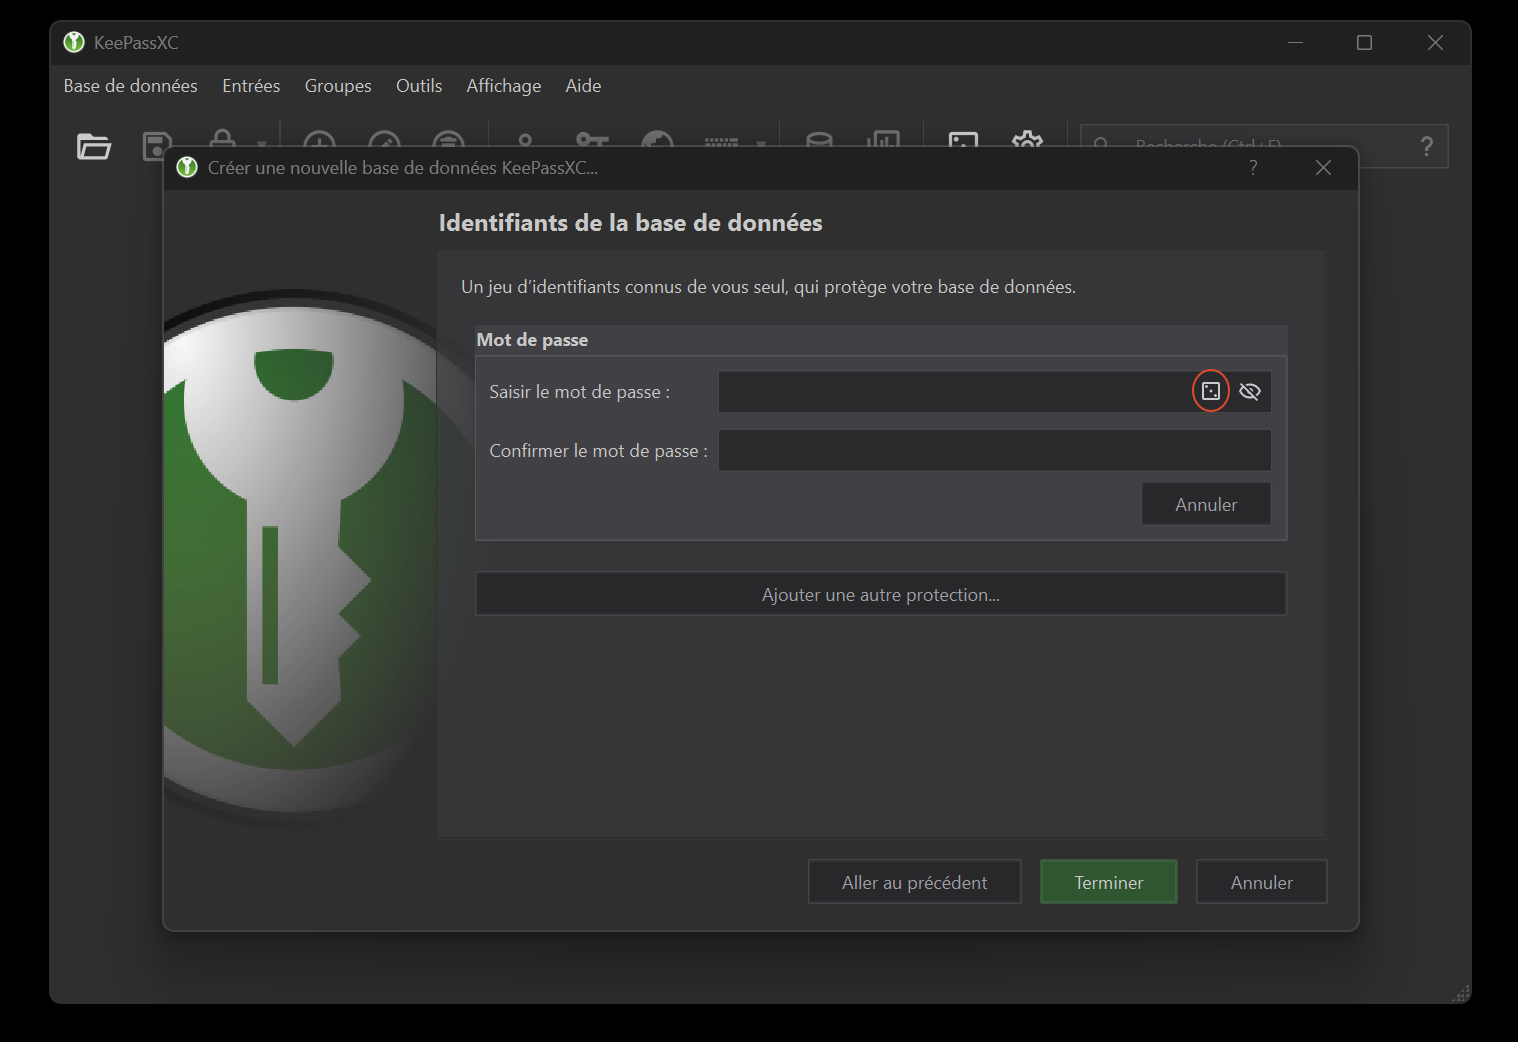
No need to modify the “Encryption parameters” unless you want to customize them to suit your requirements. The next window, “Database Identifiers”, lets you define the “master” password that will protect your database (and therefore all its contents). To summarize:
- if you only have one password to remember, this is it!
- it’s considered the one that unlocks all the others, so it has to be complicated and comply with a minimum of safety rules. Without going into too much detail about these rules, you can click on the square icon with 3 dots to open a generation aid utility (figure 4).
- this password is very important and its loss, as a general rule, will make it impossible to open the database and thus access your passwords (by default through password recovery processes).
- there’s a box underneath to “Add another protection”. The available options won’t be discussed here, but you should know that you can add security and access options, such as a key file or Q&A.
The last step asks where you want to save your database and what name you want to give it. In my example, my database will be saved as bdd_test_keepassxc.kdbx. On the other hand, if you wish to synchronize your database between several devices (see section 4, for example, for synchronization between a computer and a smartphone), it’s best to place this file in a folder. As an example here, my .kdbx file will be stored in a file named “keepass”.
Before I start creating my first passwords, take a look at the application settings. To do this, simply click on the gearwheel, or click on the “Tools” tab and then on “Settings” (figure 5).
You’re free to modify these settings to suit your preferences, but I’d recommend at least the following to enhance your interface and interactions. Please note that these options may differ slightly between versions (depending on the OS), particularly between Windows and Linux.
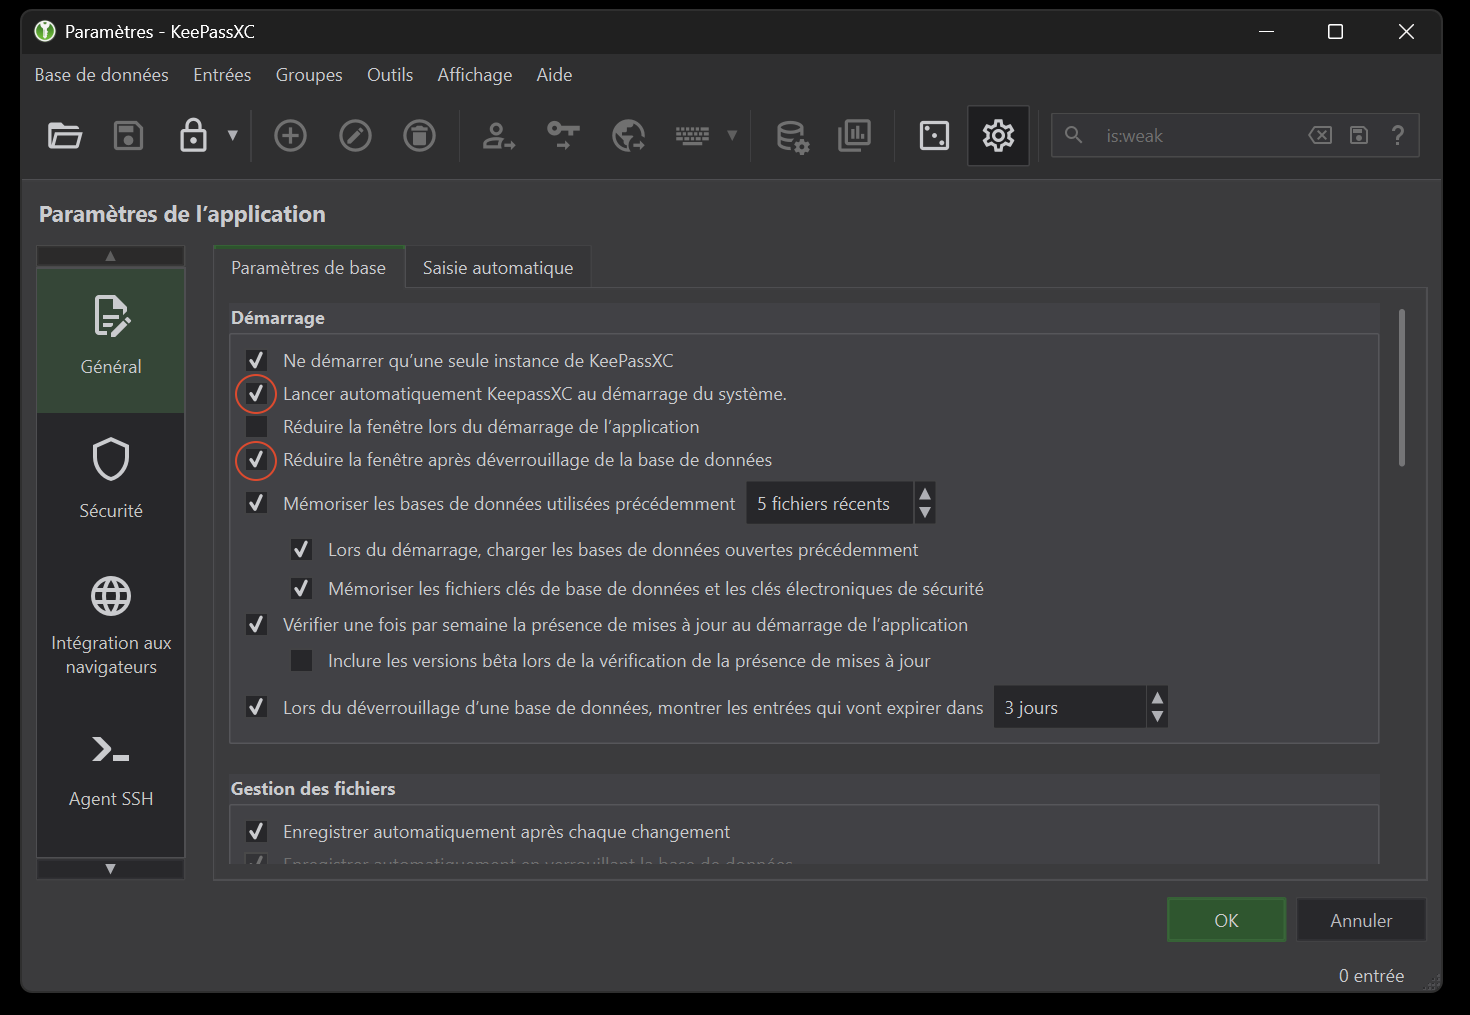
In the “General” tab, “Startup” section (figure 6) :
- if you have not already done so, check “Automatically launch KeePassXC at system startup”. Each time your system is started up, the software will launch automatically and ask you for your “master” password to unlock your database,
- check the “Minimize window after unlocking database” tab. Paired with the previous option, unlocking your database doesn’t require you to use a password right away. So there’s no need to keep the application front and center on your desktop.
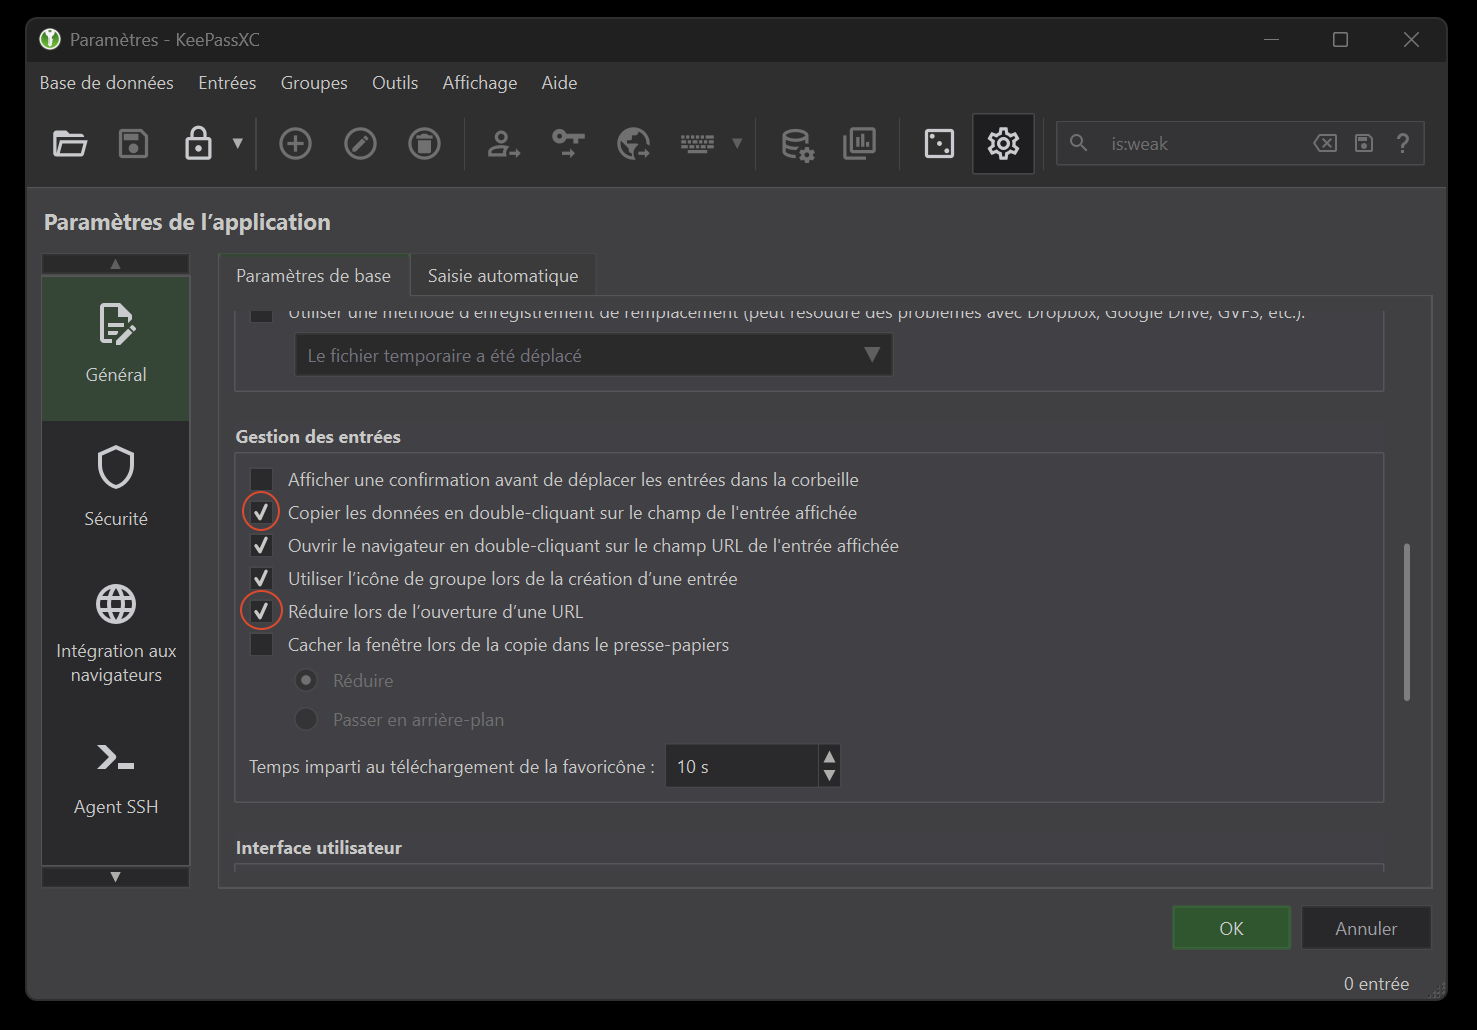
In the “General” tab, “Entry Management” section (figure 7) :
- check “Copy data on double clicking field in entry view”.
- check “Minimise when opening a URL”.
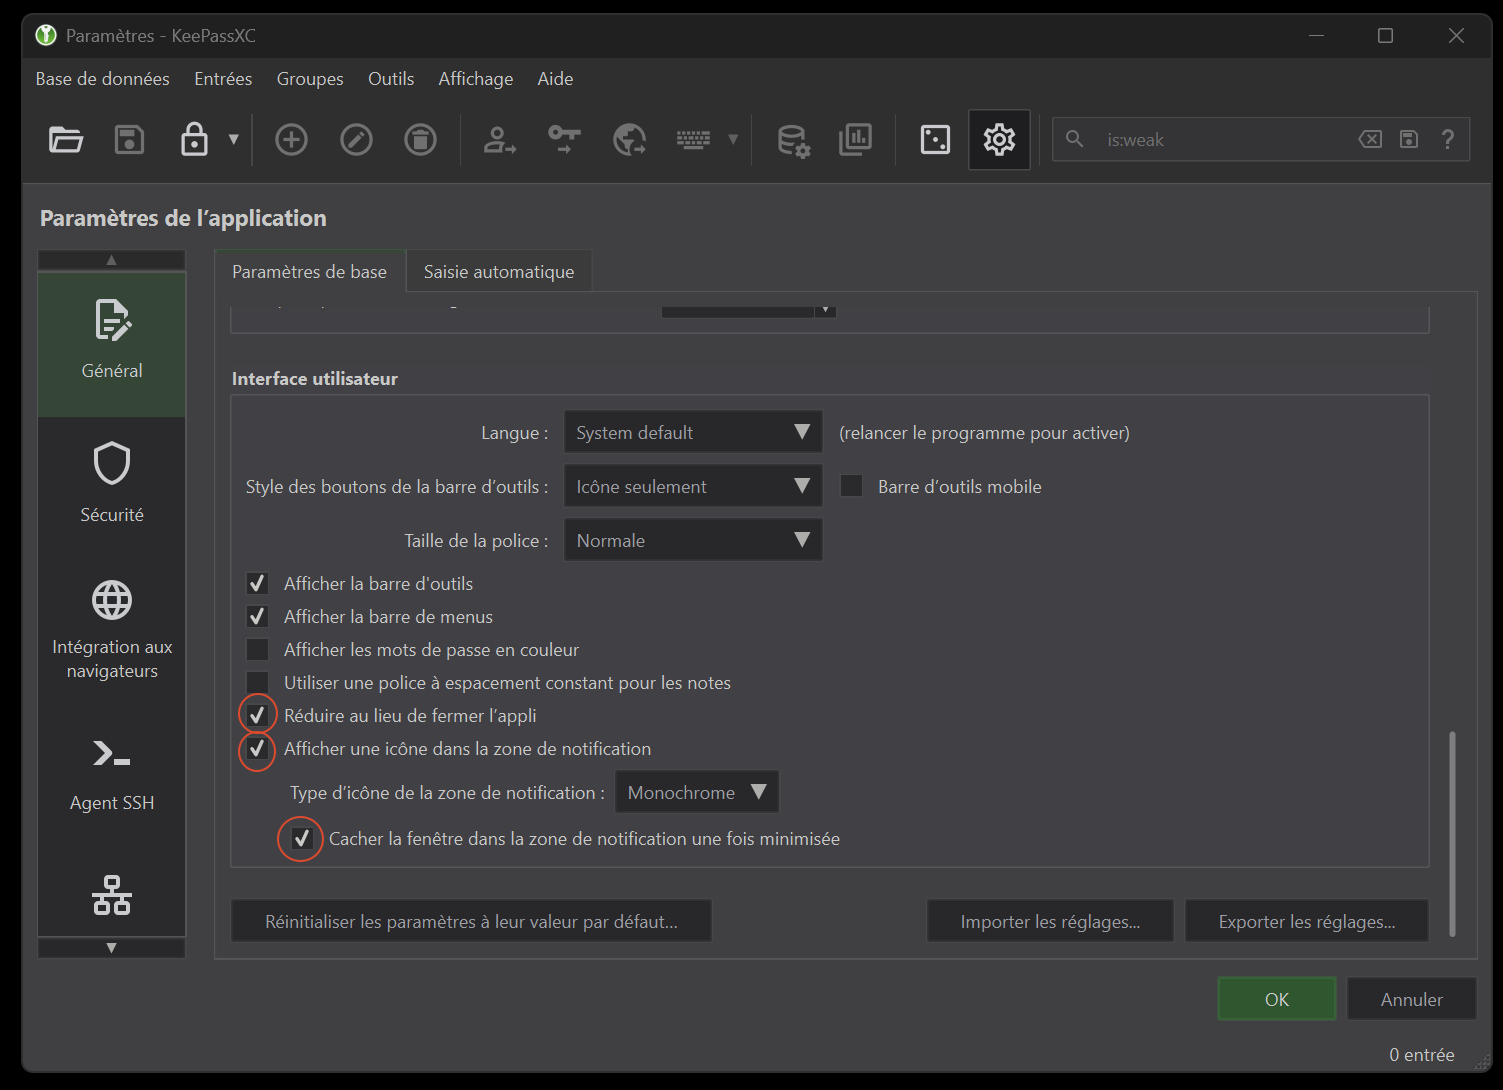
In the “General” tab, “User Interface” section (figure 8) :
- check “Minimise instead of app exit”.
- check “Show a system tray icon”.
- check “Hide window to system tray when minimized”.
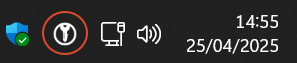
With these settings, when you close or minimize the application’s window, the application moves into your notification area (it can be in the hidden area the first time, figure 9) instead of closing the application permanently (to do this, click on the “Database” tab, then “Quit” at the very bottom). When your application is in this zone, simply double-click on it to open it.
2 - Application overview
2.1 - Application interface
Your database interface is divided into 4 parts (figure 10).
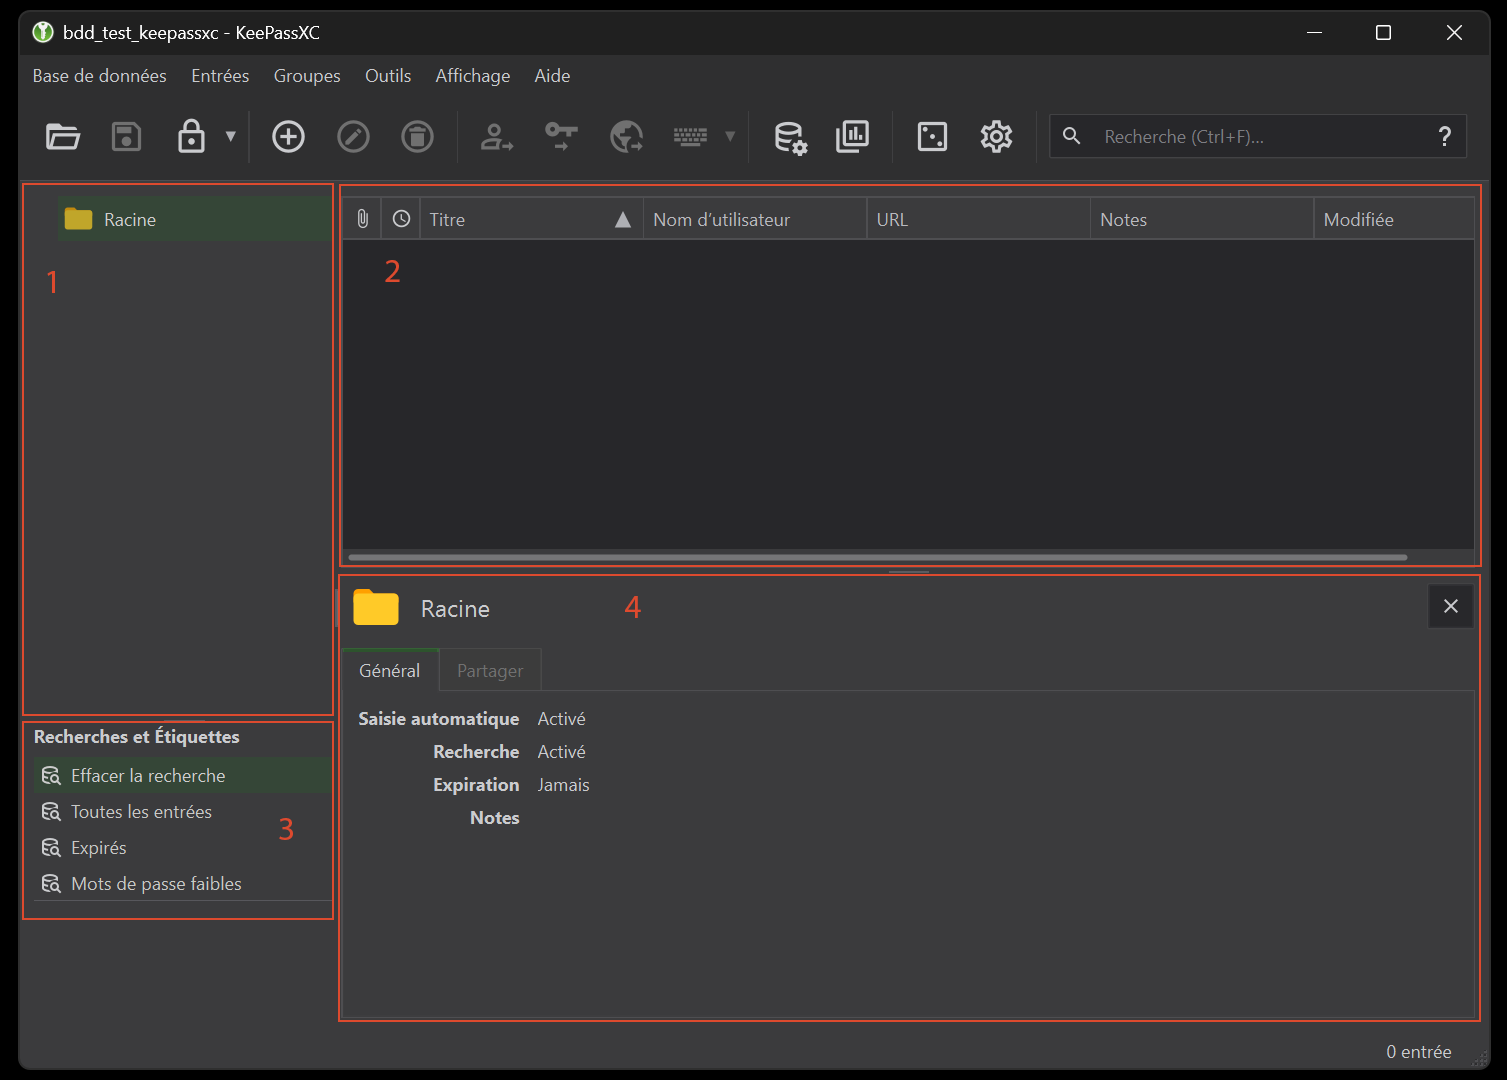
The first section lists all your passwords. You can organize them into groups and even sub-groups (here, by default, a group named “Root” has been created) and you can even change the icons of the items.
The second part lists the entries present in your groups and in your database in general. As before, you can modify the display of these entries, in particular by modifying the associated icons.
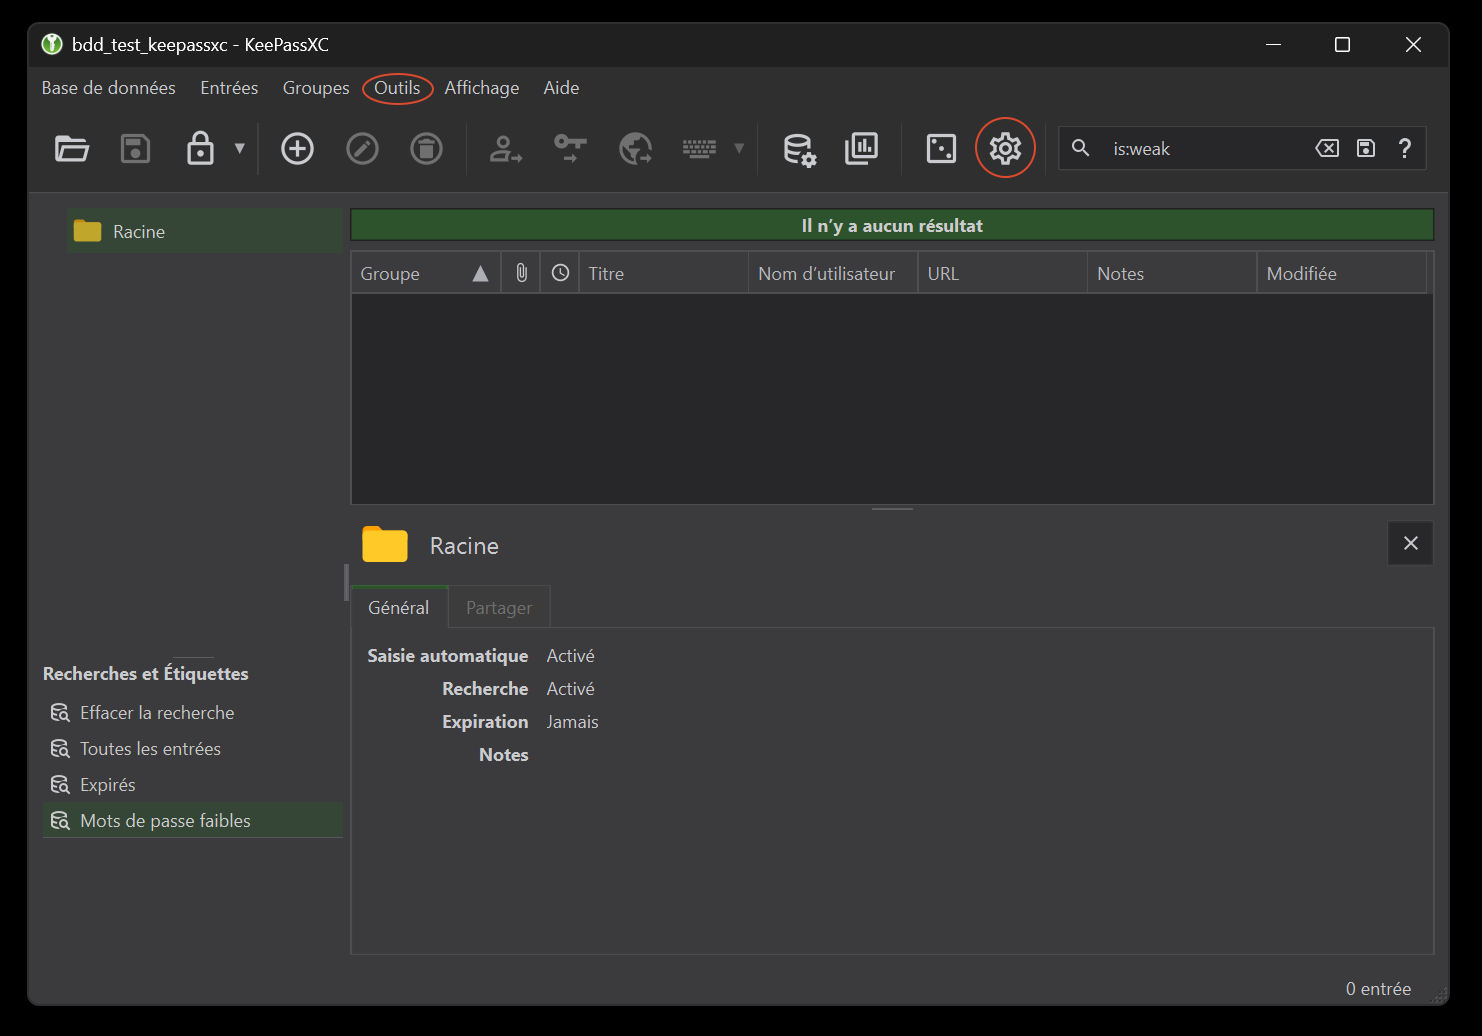
The third section contains shortcuts to dynamic groups or tags you’ve created. These latter resources are parameters that you can associate with entries and/or groups, providing simplified access, rather like shortcuts. An interesting detail is that this section also includes tabs for diagnosing the status of some of your passwords, notably by searching for expired passwords or low levels of security (for example, if your password is very short in terms of the number of characters).
The last part is the preview tab, which gives you a summary of the contents of your entries, for example.
The toolbar is divided into 5 sections (figure 11).

Part 1 includes tabs for opening a database, saving the active database or locking it.
Section 2 allows you to create or modify entries (add and/or delete).
Section 3 allows you to use shortcuts to copy certain elements from selected entries.
Section 4 provides access to database parameters and reports, as well as the password generator.
The last section provides access to a search bar.
2.2 - Entry creation
To create a new entry, simply click on the + icon in section 2 of the toolbar. By default, we were in the “Root” group, so this entry will be located in this group. Here’s an example using my CNRS account. Here, the minimum information required to create an entry is “Title”, “User name” and “Password”.(figure 12). We’ll leave the “URL” field empty for the moment, and use it later to automatically populate fields via the browser. Note that you have many other options, such as the “Icon” menu on the side or the “Notes” field, which lets you add comments or hints to your entry. By default, the password is hidden. This is very useful, as you don’t need to be able to see the password to use it later (especially useful if you’re in public places).
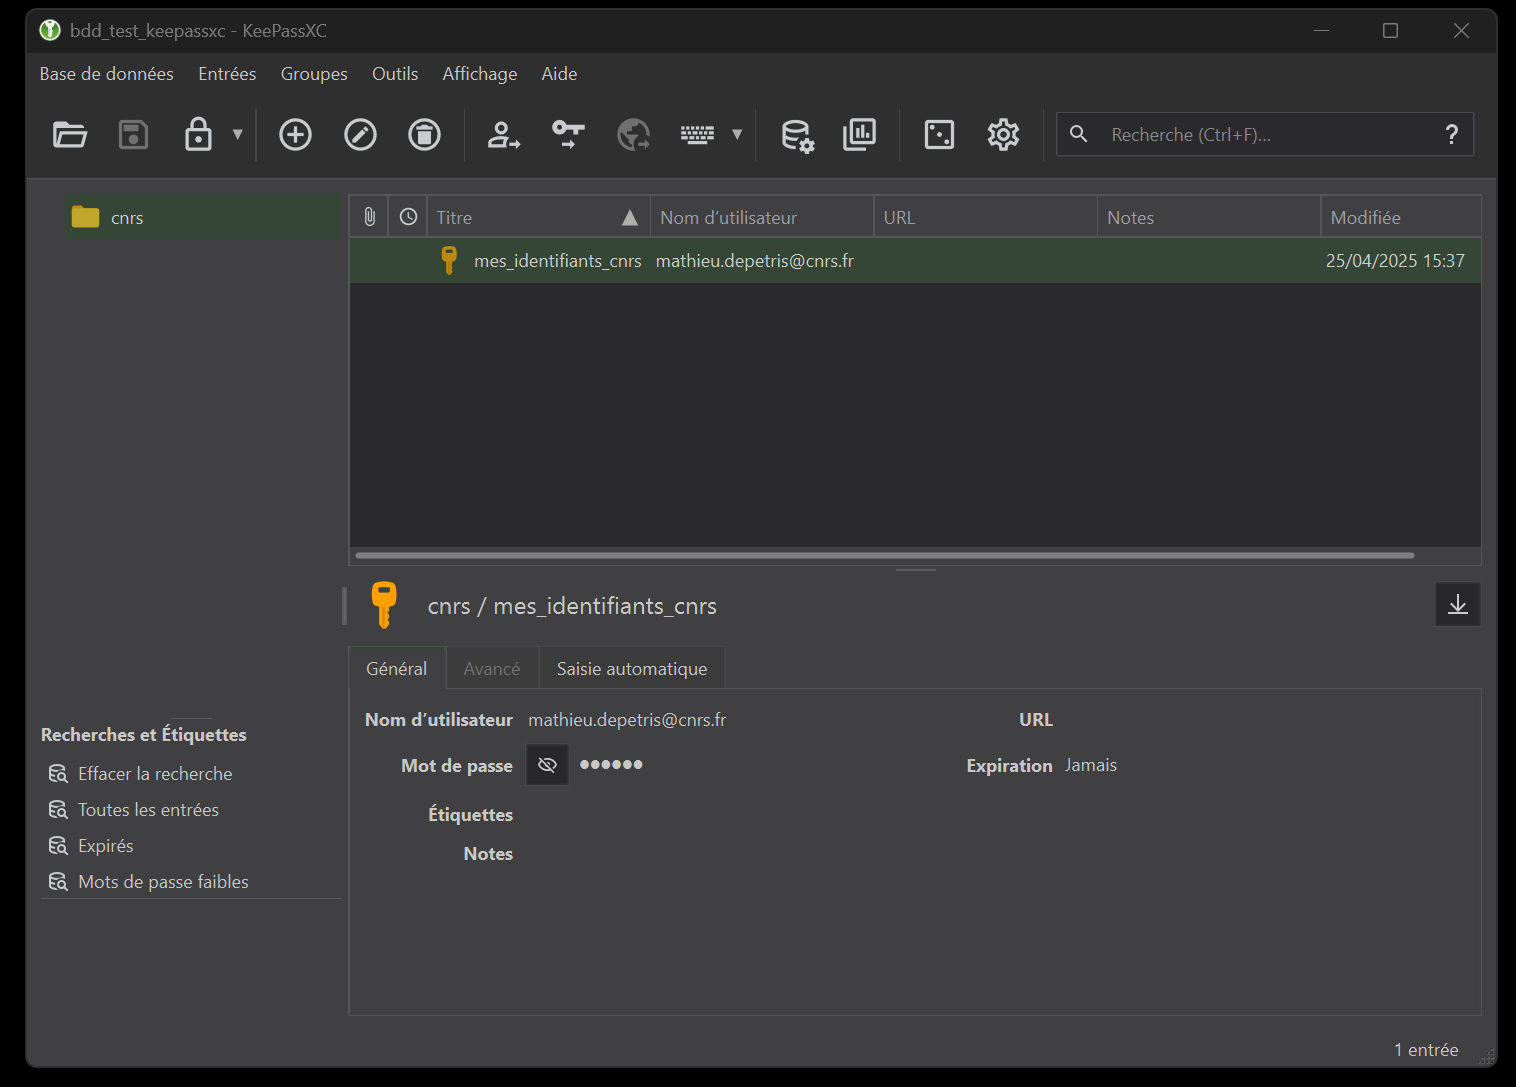
Once the action has been validated, the entry is found in our database (figure 13). To improve the readability of my interface, I’ve even changed the name of the “Root” group to “cnrs”.
Now if I want to copy part of my entry, for example the user name or password, all I have to do is use the buttons in section 3 of the toolbar. Note that when copying a password (the button with the key), you have a limited time in which to use it before it is deleted from your “copy memory” (= clipboard), figure 14). You can configure this time in the “Settings” menu, in the “Security” tab, in the “Timeout” section and the “Clear clipboard after” option.

3 - Browser integration
One of the most practical options is to integrate your safe with your browser. More concretely, this means you’ll be able to fill in usernames and passwords semi-automatically when you visit related websites.
KeePassXC integrates with the following browsers:
- Based on Chrome, Chromium, Vivaldi and Brave,
- Based on Mozilla Firefox and Tor-Browser,
- Based on Microsoft Egde.
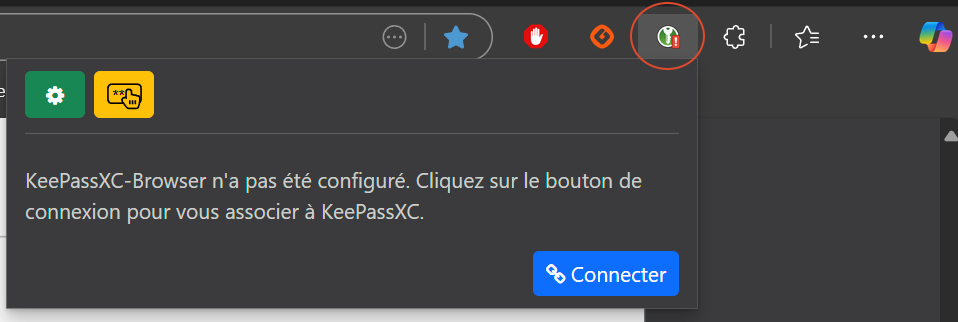
The first thing to do is activate the association option in the KeePassXC settings. To do this, simply go to the “Browser integration” tab in the settings. (figure 15).
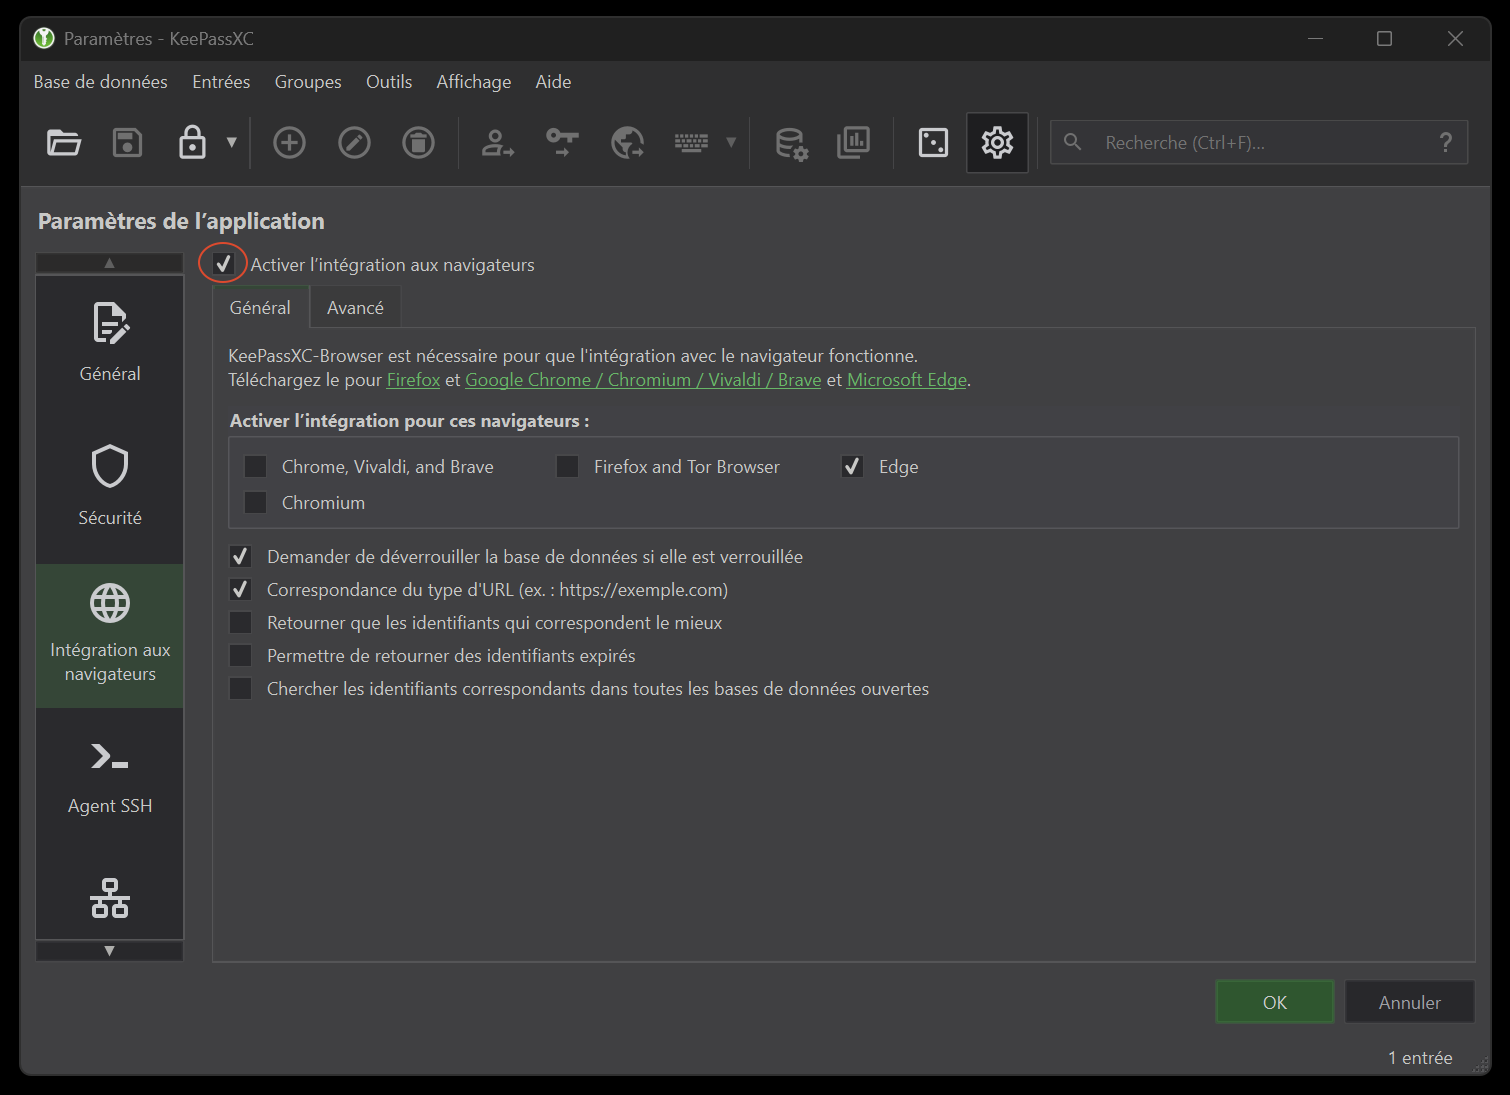
For my example, I’m going to test with the Egde browser, but the principle remains the same for the others, and you can even combine several at once.
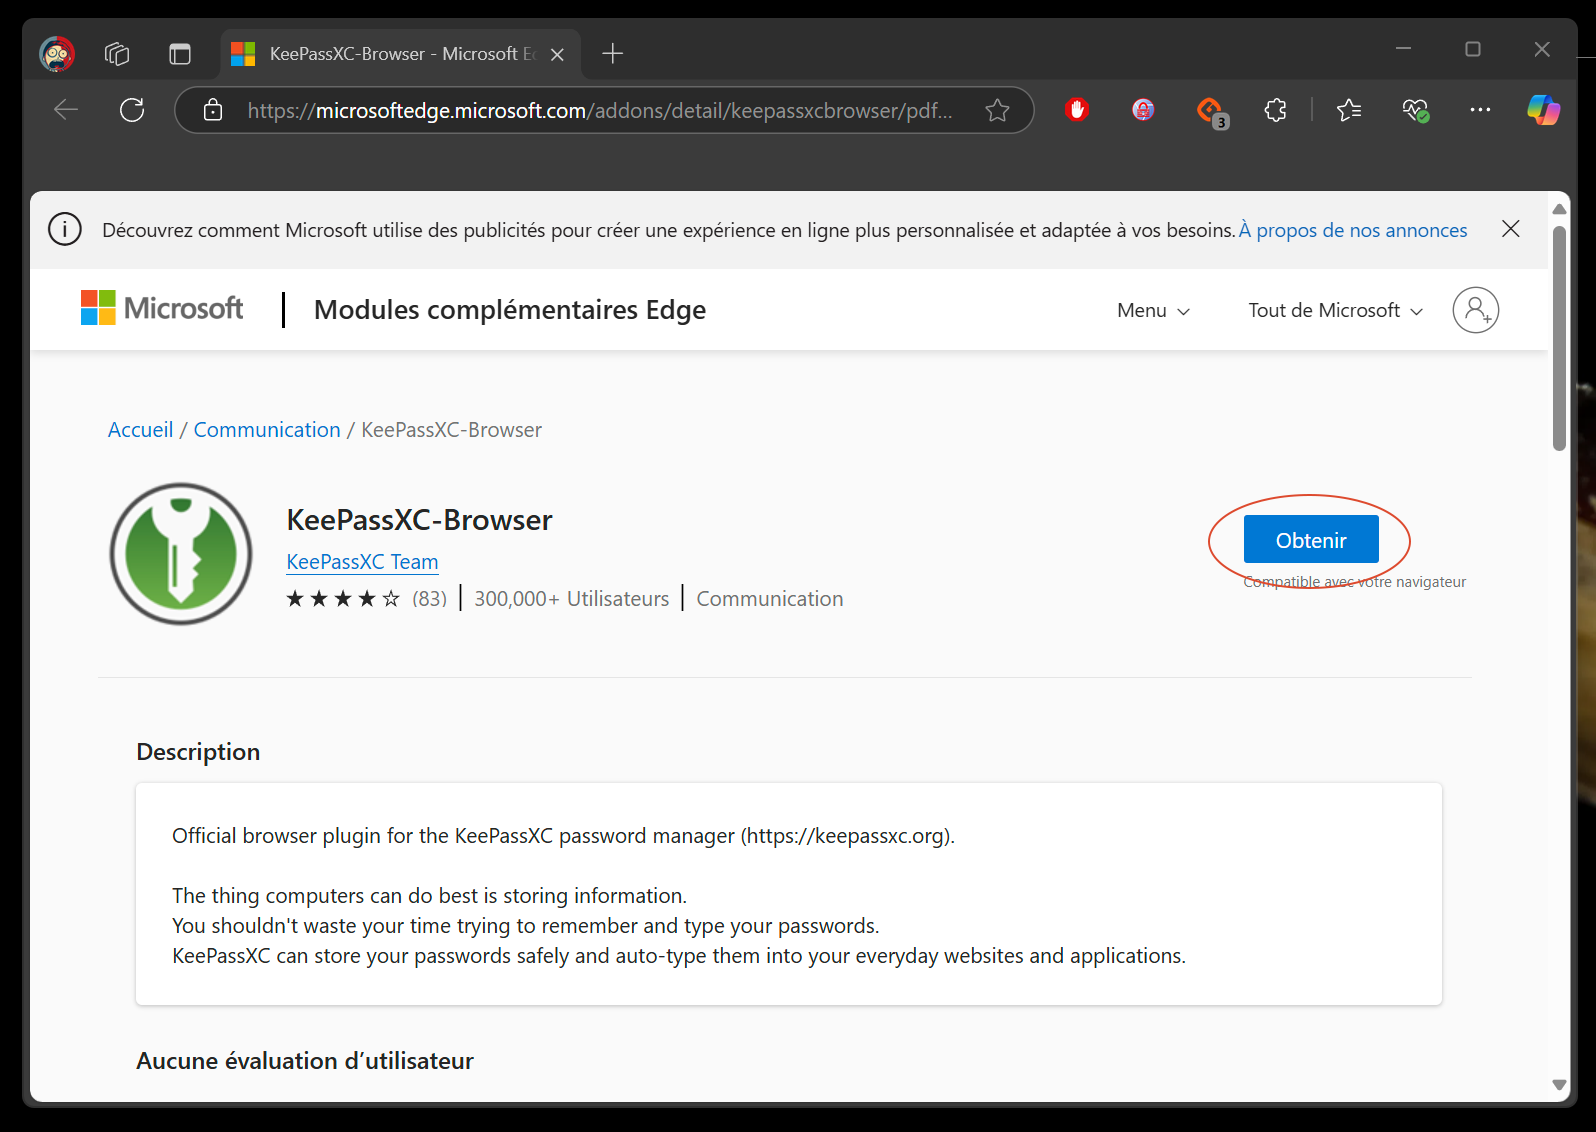
The second step is to install the extension on your browser. Click on the links just below the “Browser integration” tab. You should be redirected to an installation page (again, here with the Microsoft Egde example, figure 16).
After installation, restart your browser and you should have the extension in this form (figure 17, the KeePassXC database must be unlocked).
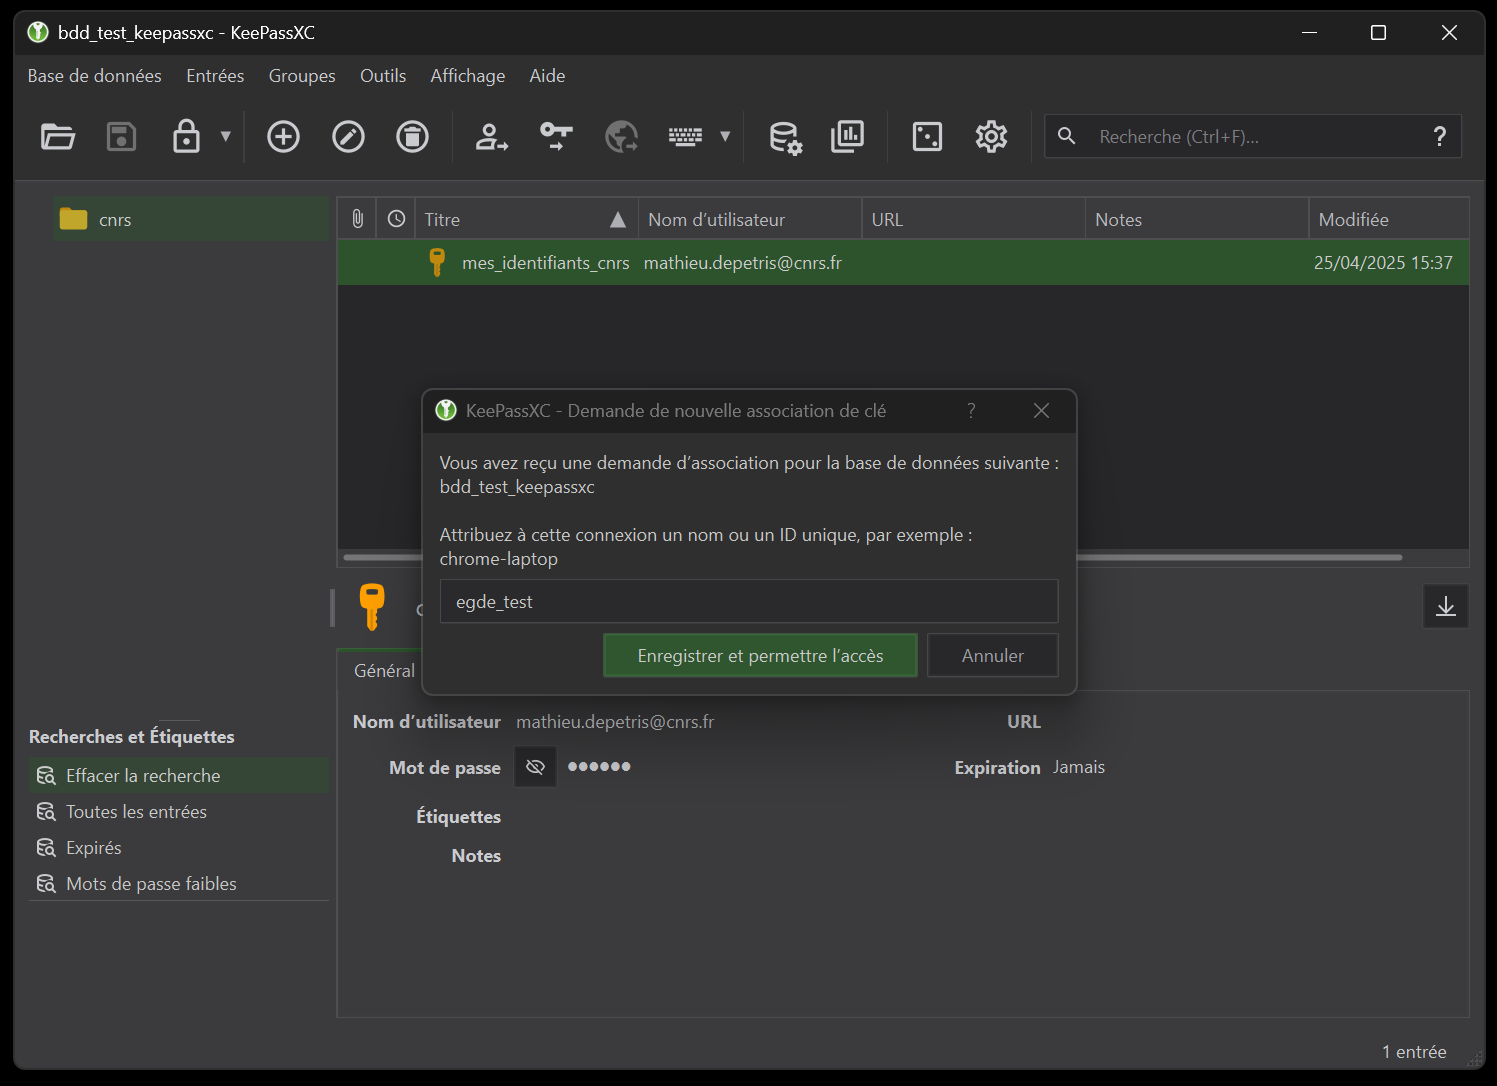
Now click on the “Connect” button, then on your database window specify a name for the key association request (figure 18).
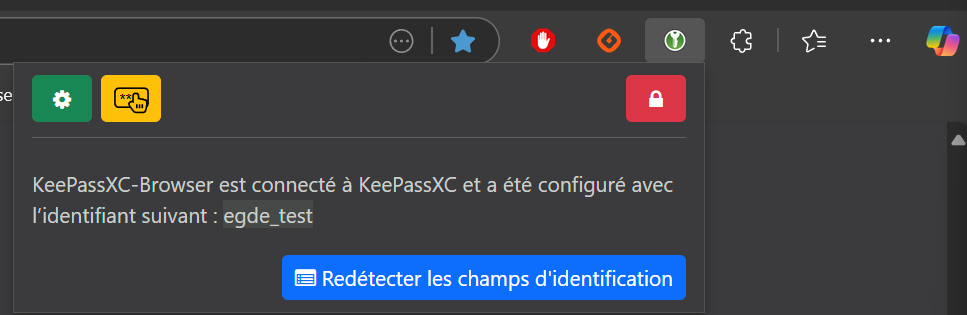
Your extension should now be correctly configured (figure 19).
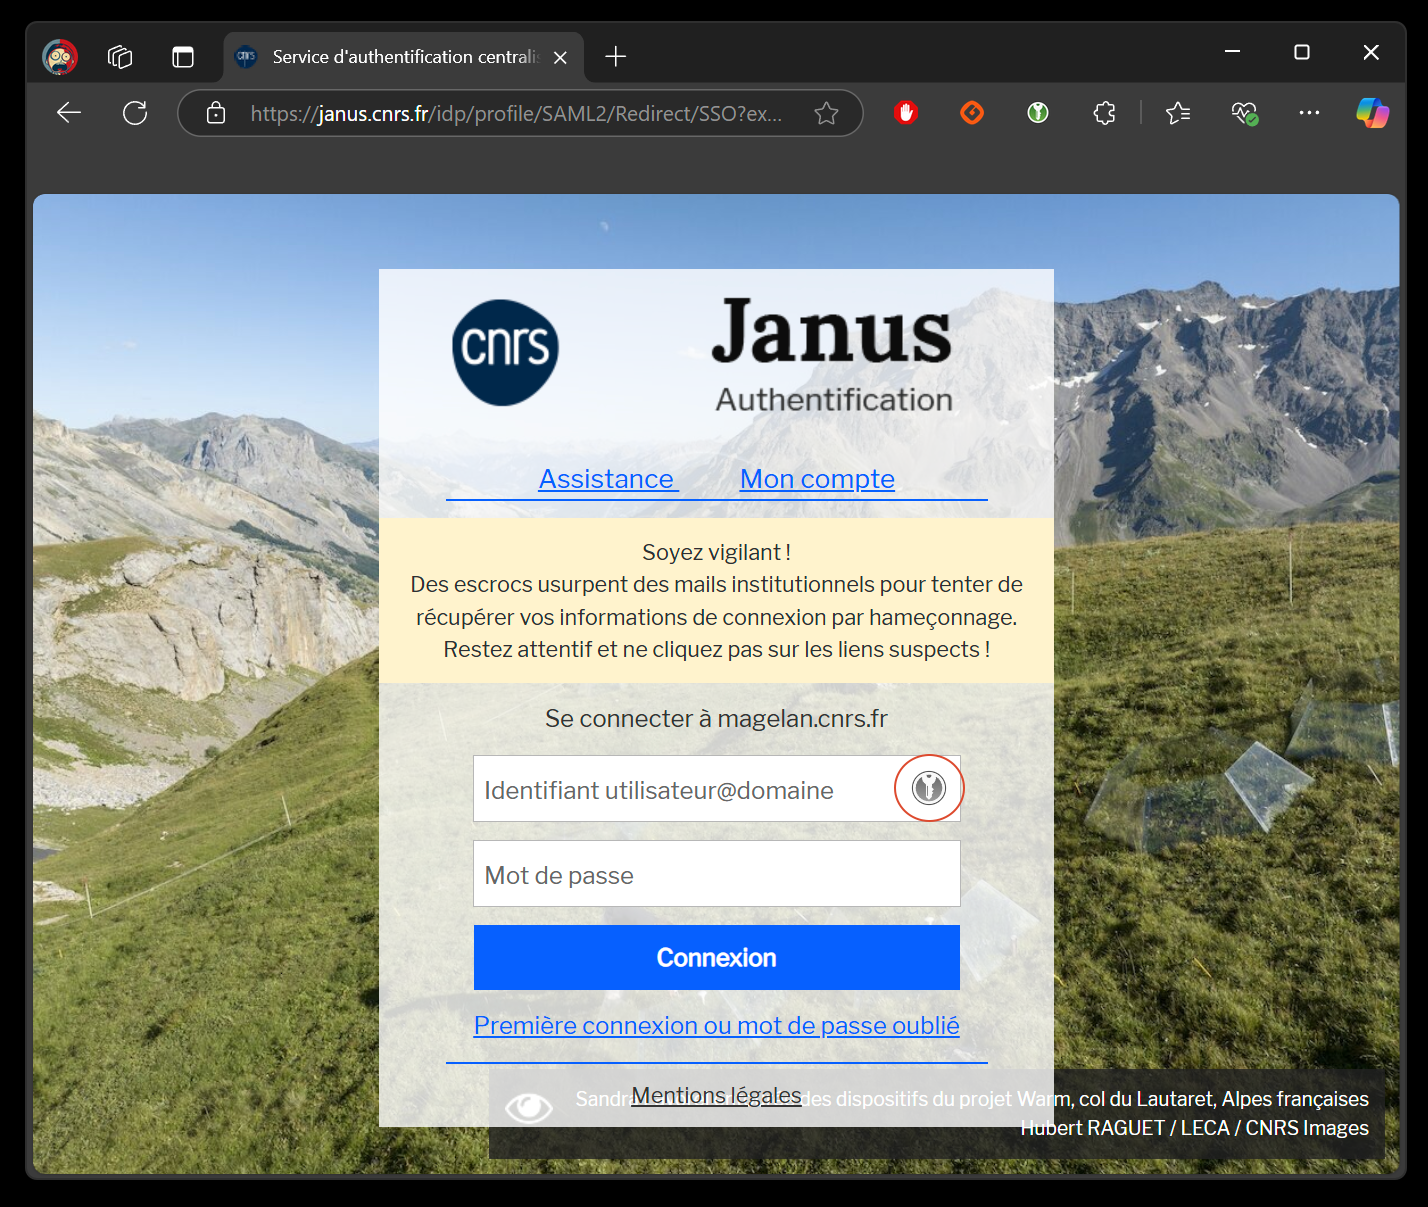
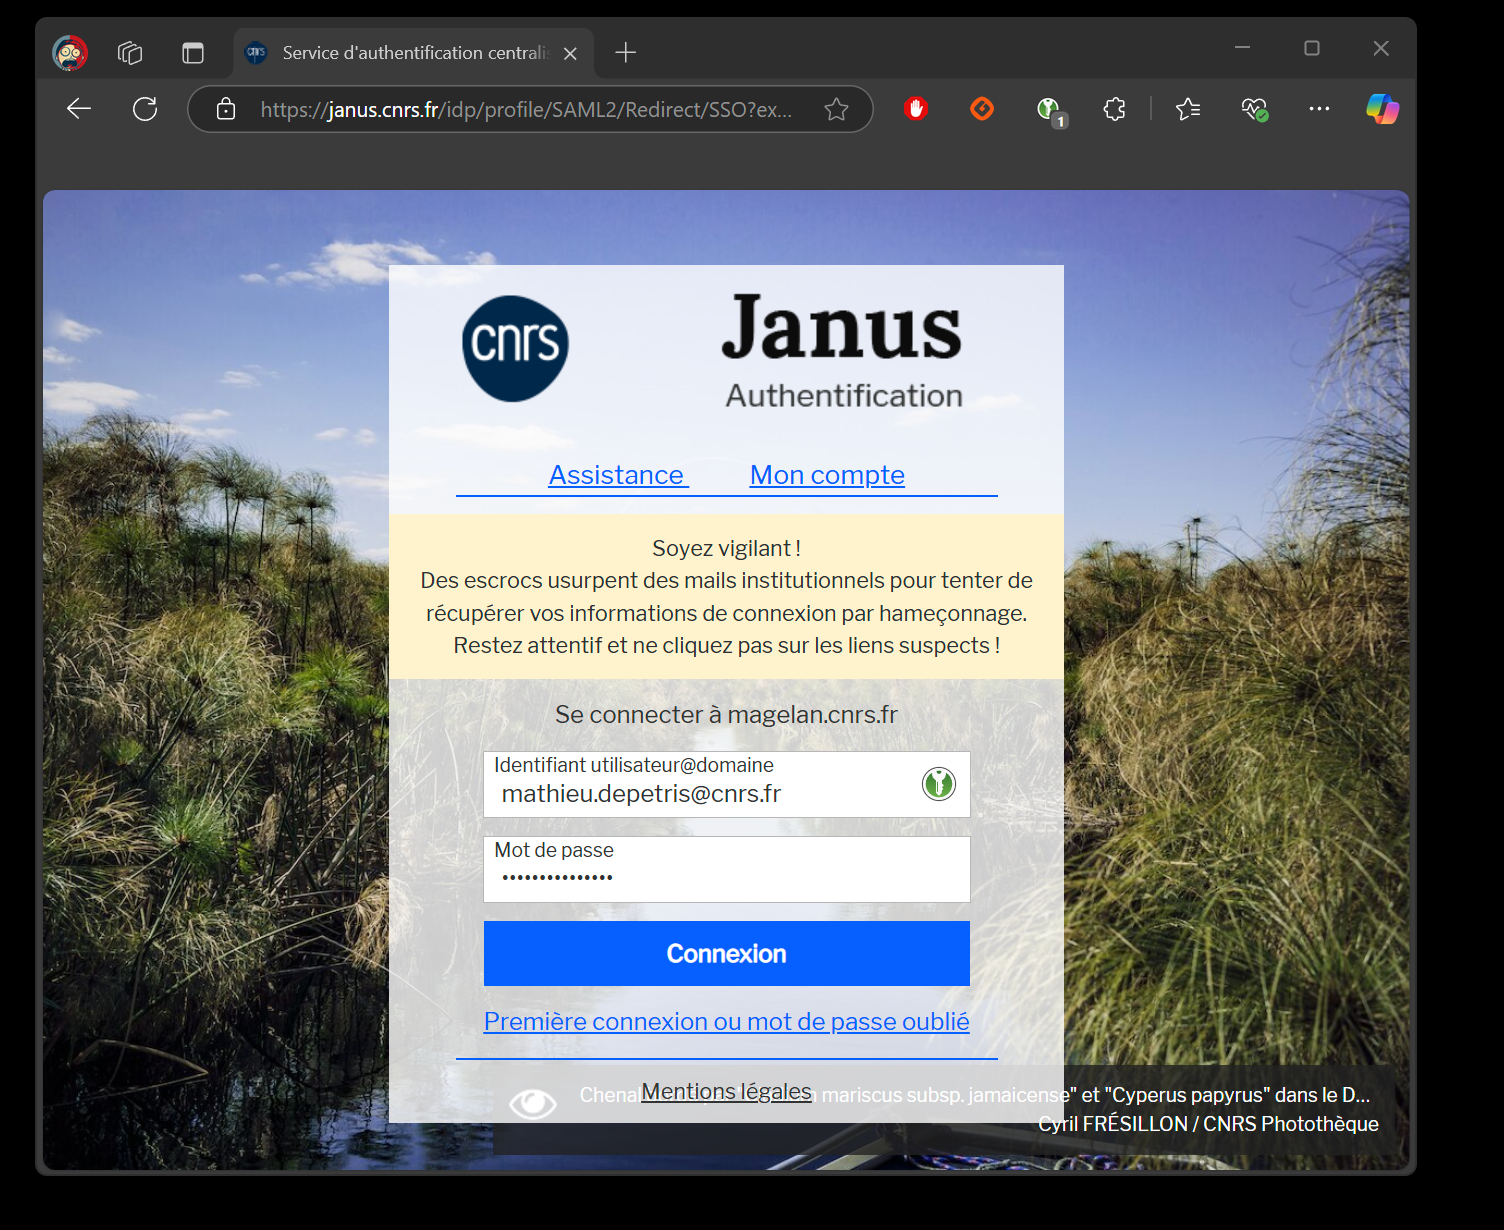
Next, we’re going to test semi-automatic filling on the entry I created earlier in connection with my CNRS login. To do this, I go to a CNRS login page (figure 20).
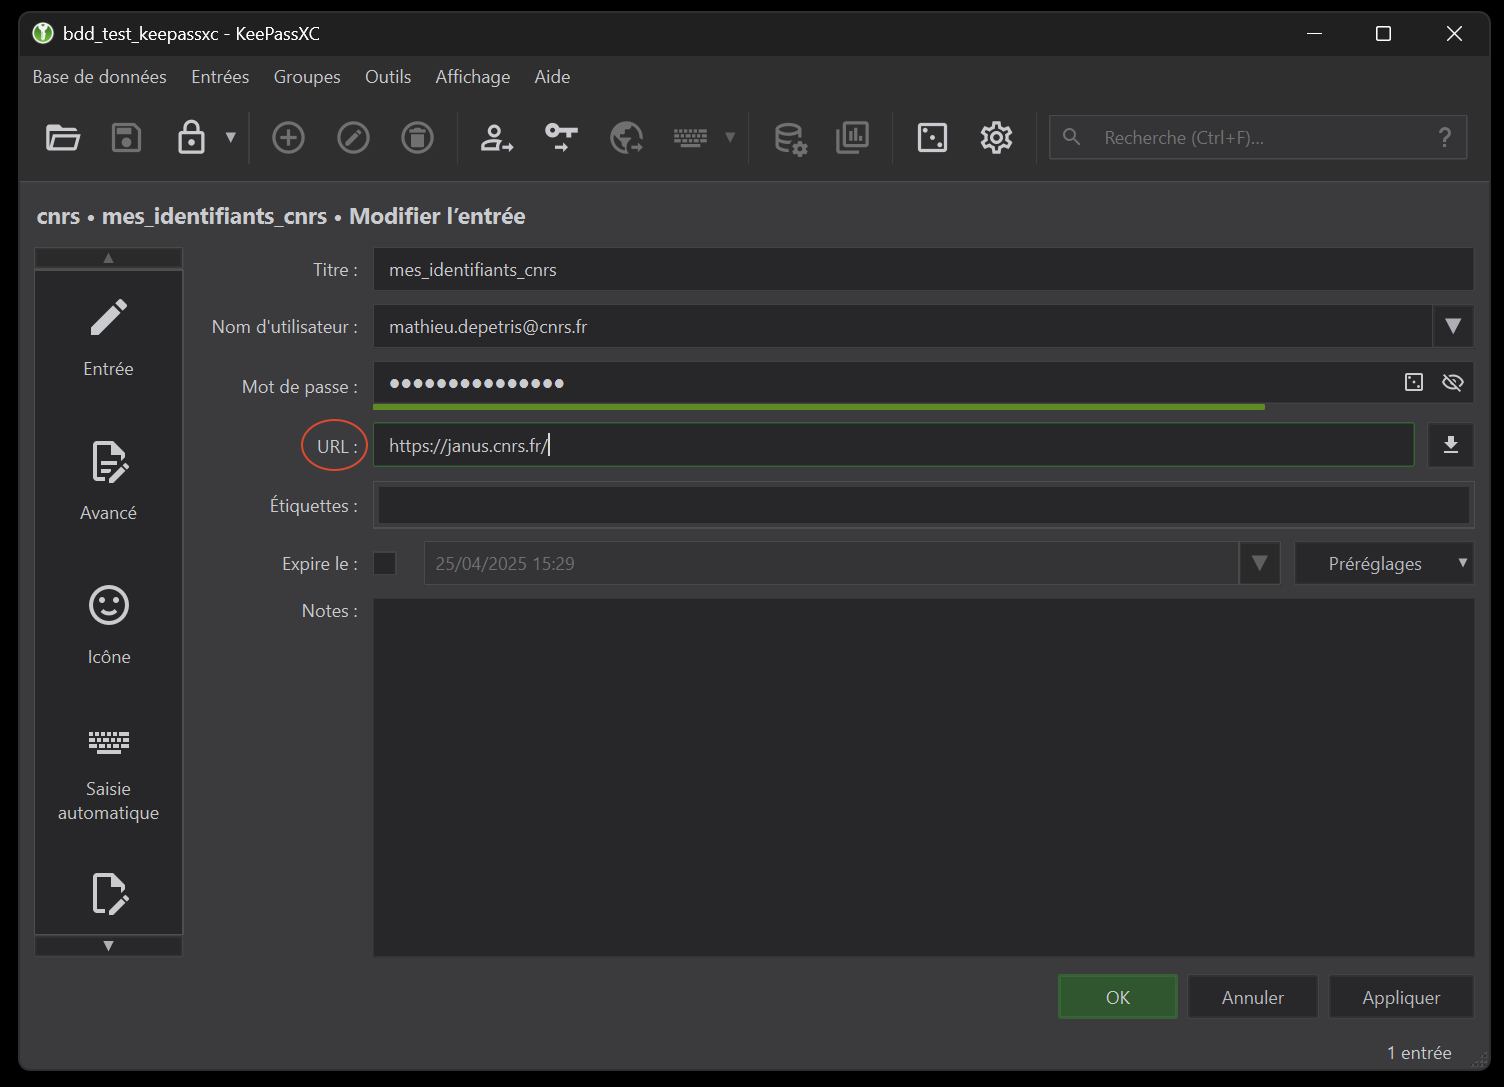
Here I’m going to copy the URL of this page in order to add it to my database entry. You’ll notice that the extension has already detected the possibility of adding fields linked to an entry in my database (via the extension’s greyed-out tab). What’s more, you don’t need to copy the entire URL, just stop after the .fr.You can apply this rule to other URLs, as it allows you to generalize auto-fill detection, although there are rare cases where it doesn’t work. In our case, we’ll just use the URL “https://janus.cnrs.fr/”, which we’ll add to the “URL” field of our previous entry. (figure 21).
Now refresh your browser page (being on the CNRS login page) or click on the extension icon in the browser, then click on “Redetect login fields”. The following KeePassXC window should appear (figure 22).
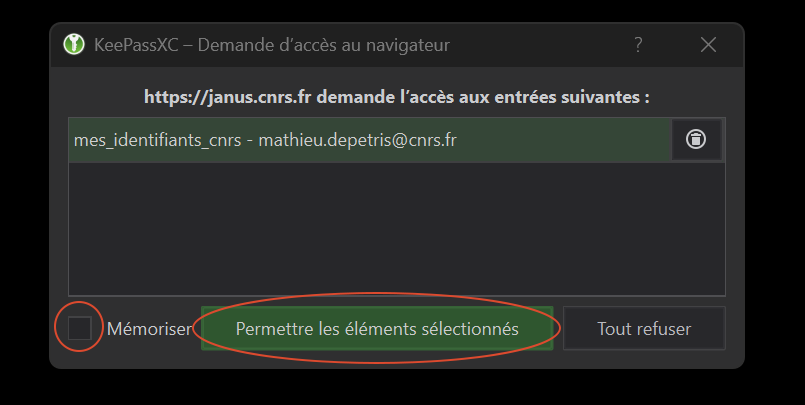
All you have to do now is check the “Remember” and “Allow selected items” boxes. Now, every time you arrive on a page with “https://janus.cnrs.fr/” at the beginning of the URL, KeePassXC will suggest semi-automatically filling in fields related to what you’ve entered in your database (figure 23).
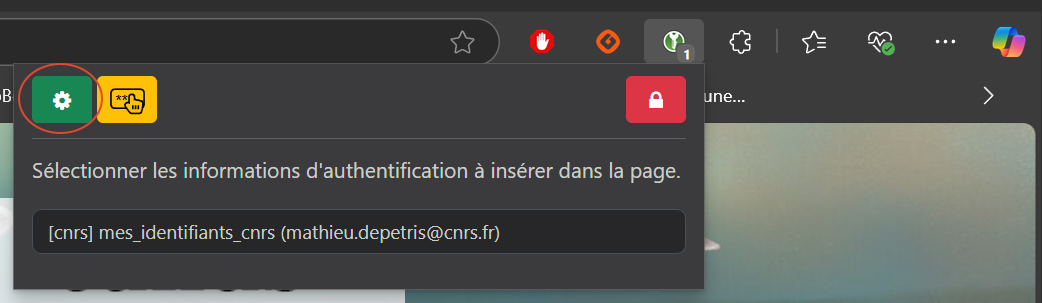
One last little tip, rather than clicking on the extension icon or field to select the corresponding entry in the database, you can use keyboard shortcut functions. You’ll find them in the browser’s extension settings tab (by clicking on the green notched road), figure 24), “General” tab, “Keyboard shortcuts” section. These are configurable, and in my default example (under Windows) you use Alt + Shift + U to enter your username and password.
4 - Multi-device synchronization
For this last part, we’re going to configure our database so that it can synchronize across multiple devices. This part is slightly more technical, so it’s important not to get discouraged and, to put it simply, “let go of the railing”. Don’t forget that you can always come back to me if you need help.
In this example, we’re going to set up two configurations that will probably meet most of your needs:
- synchronization between a computer and a smartphone,
- synchronization between two computers.
In addition, you’ll note that the examples below were created using Windows for the computers and Android for the smartphone. Where this has been identified, alternatives to other OSes will be listed, but there is no guarantee that they have been tested to the full extent of the procedure’s objective.
4.1 - Syncthing software
The first step is to install software on our devices that will enable us to perform our synchronizations. To do this, we’ll be using Syncthing which is a free, open-source program that synchronizes files between devices in real time, without the need for a central server. It’s private, secure, encrypted and easy to use.
Importantly, as mentioned above, this software does not operate via a central server. In practice, this means that during synchronization processes, the devices must be connected at the same time. In the case of two computers, this condition can be complicated to meet, especially if we use one at work and the second at home for telecommuting. That’s why, in our configuration, our phone will be the equivalent of our “central server”, as it will have “more chance” of being connected at the same time as the computers.
On the application’s official website, go to the “Downloads” section. You’ll find that there are several distributions available, depending on your operating system.
As a guide, the process for installing it on a Linux system can be found at next. Follow the instructions and run the associated command lines. You should have two shortcuts to the application:
- Start Syncthing” to launch the software,
- Syncthing Web UI” takes you to the software configuration page (see next section for details).
Finally, unlike Windows, which automatically launches Syncthing when the OS starts up, you’ll need to configure this automatic startup on Linux (for example, by running the “Start Syncthing” shortcut at each boot).
4.2 - Installing and configuring the Syncthing client under Windows
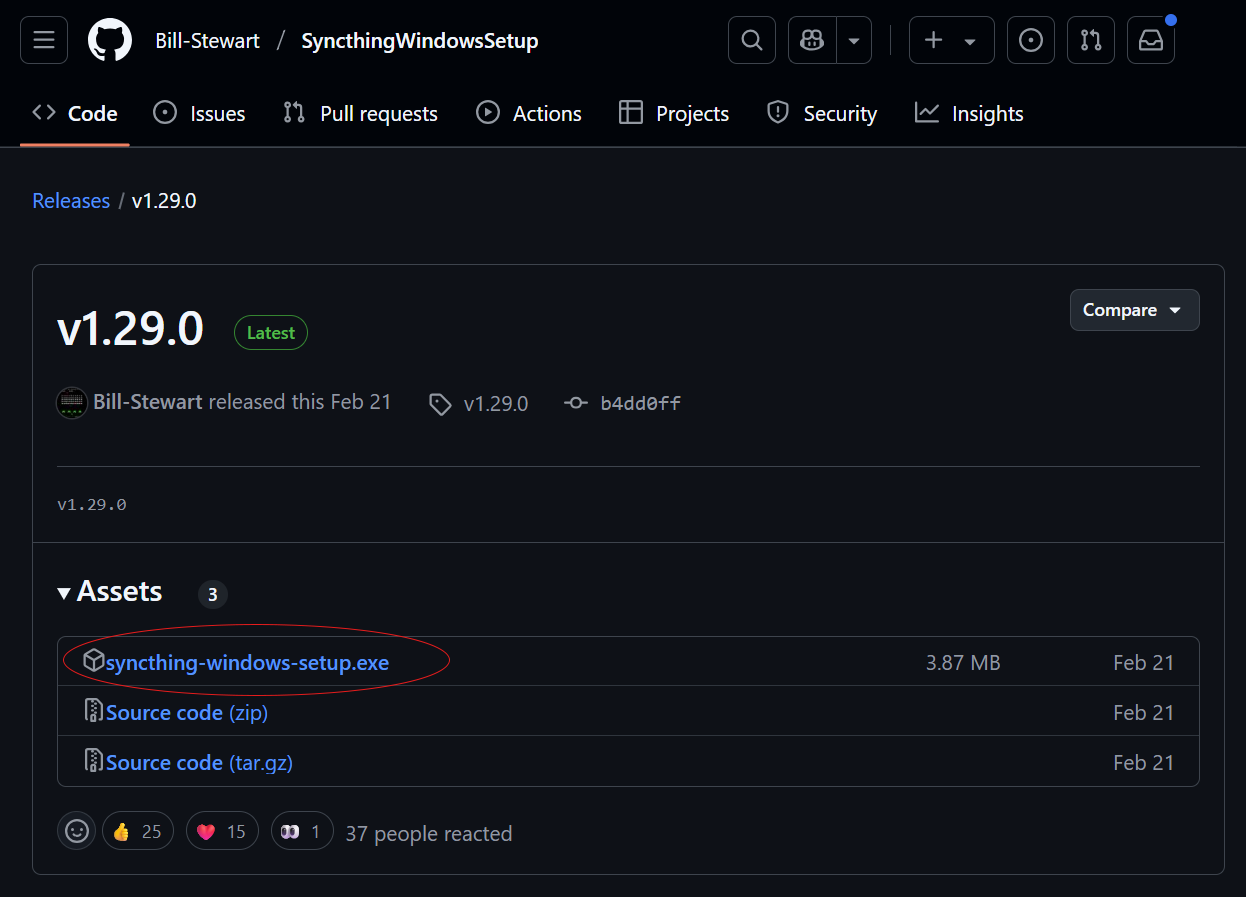
We’re going to start by installing it on our computer, selecting the “Syncthing Windows Setup” integration which allows you to install it under Windows. To keep things simple, go to this link and download the .exe executable (figure 25, currently the latest version is 1.29.0).
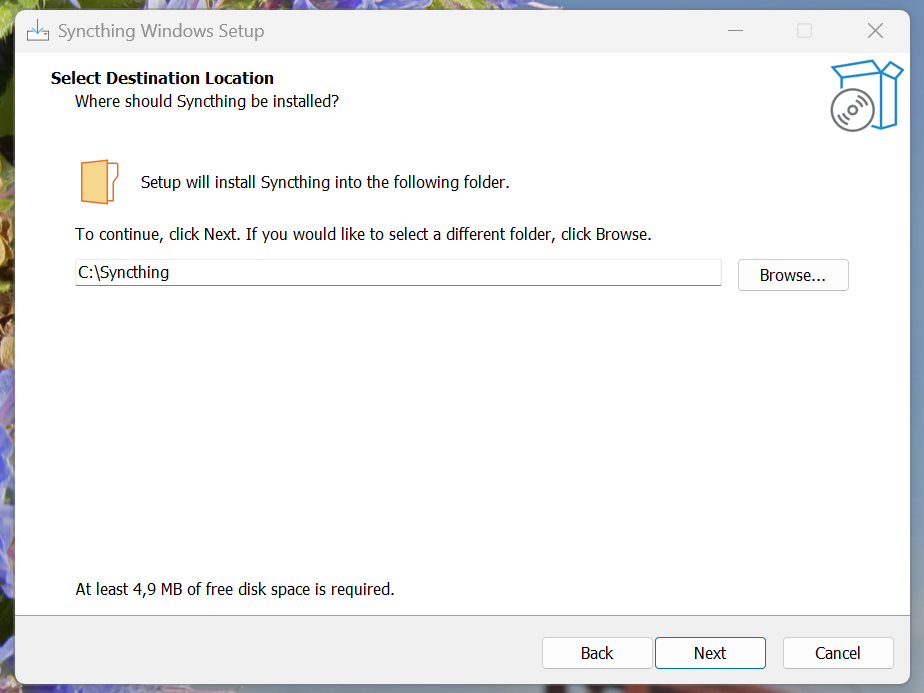
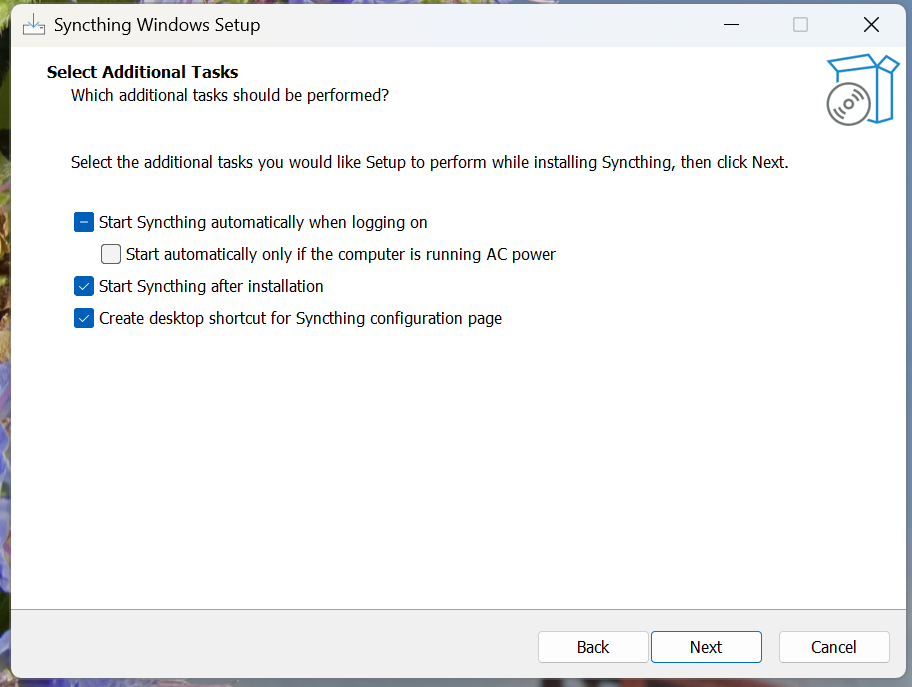
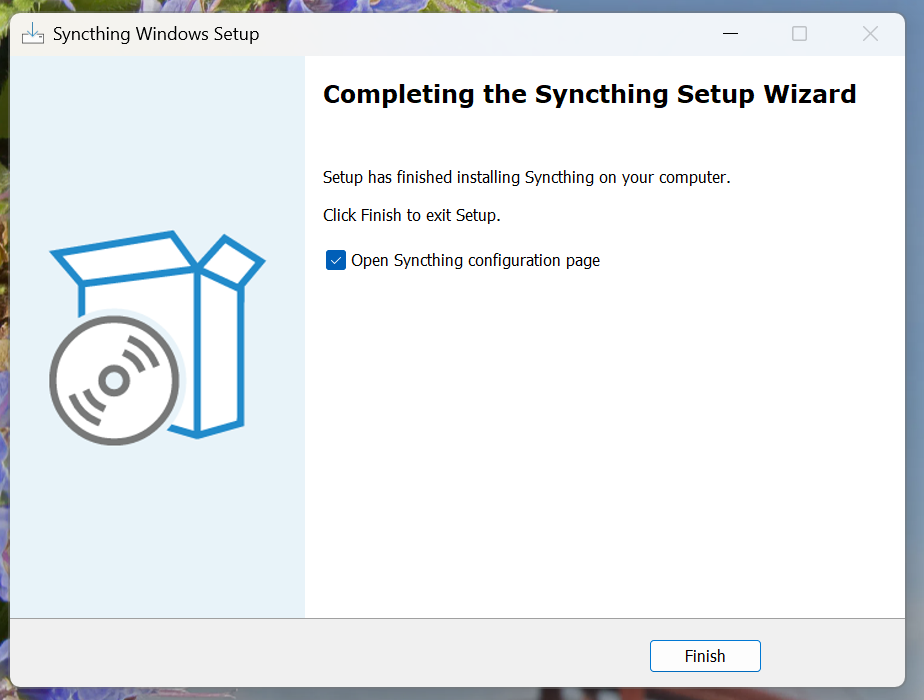
During installation, if possible with administrator rights, follow these steps:
- when the “Select Destination Location” window appears, change the path to a “simpler” one, such as “C:\Syncthing” (figure 26),
- in the “Select Additional Tasks” window, check the “Create desktop shortcut for Syncthing configuration page” box in addition to the boxes already checked (figure 27),
- click yes when prompted to create a firewall rule (figure 28),

- finally, check the “Open Syncthing configuration page” box (figure 29).
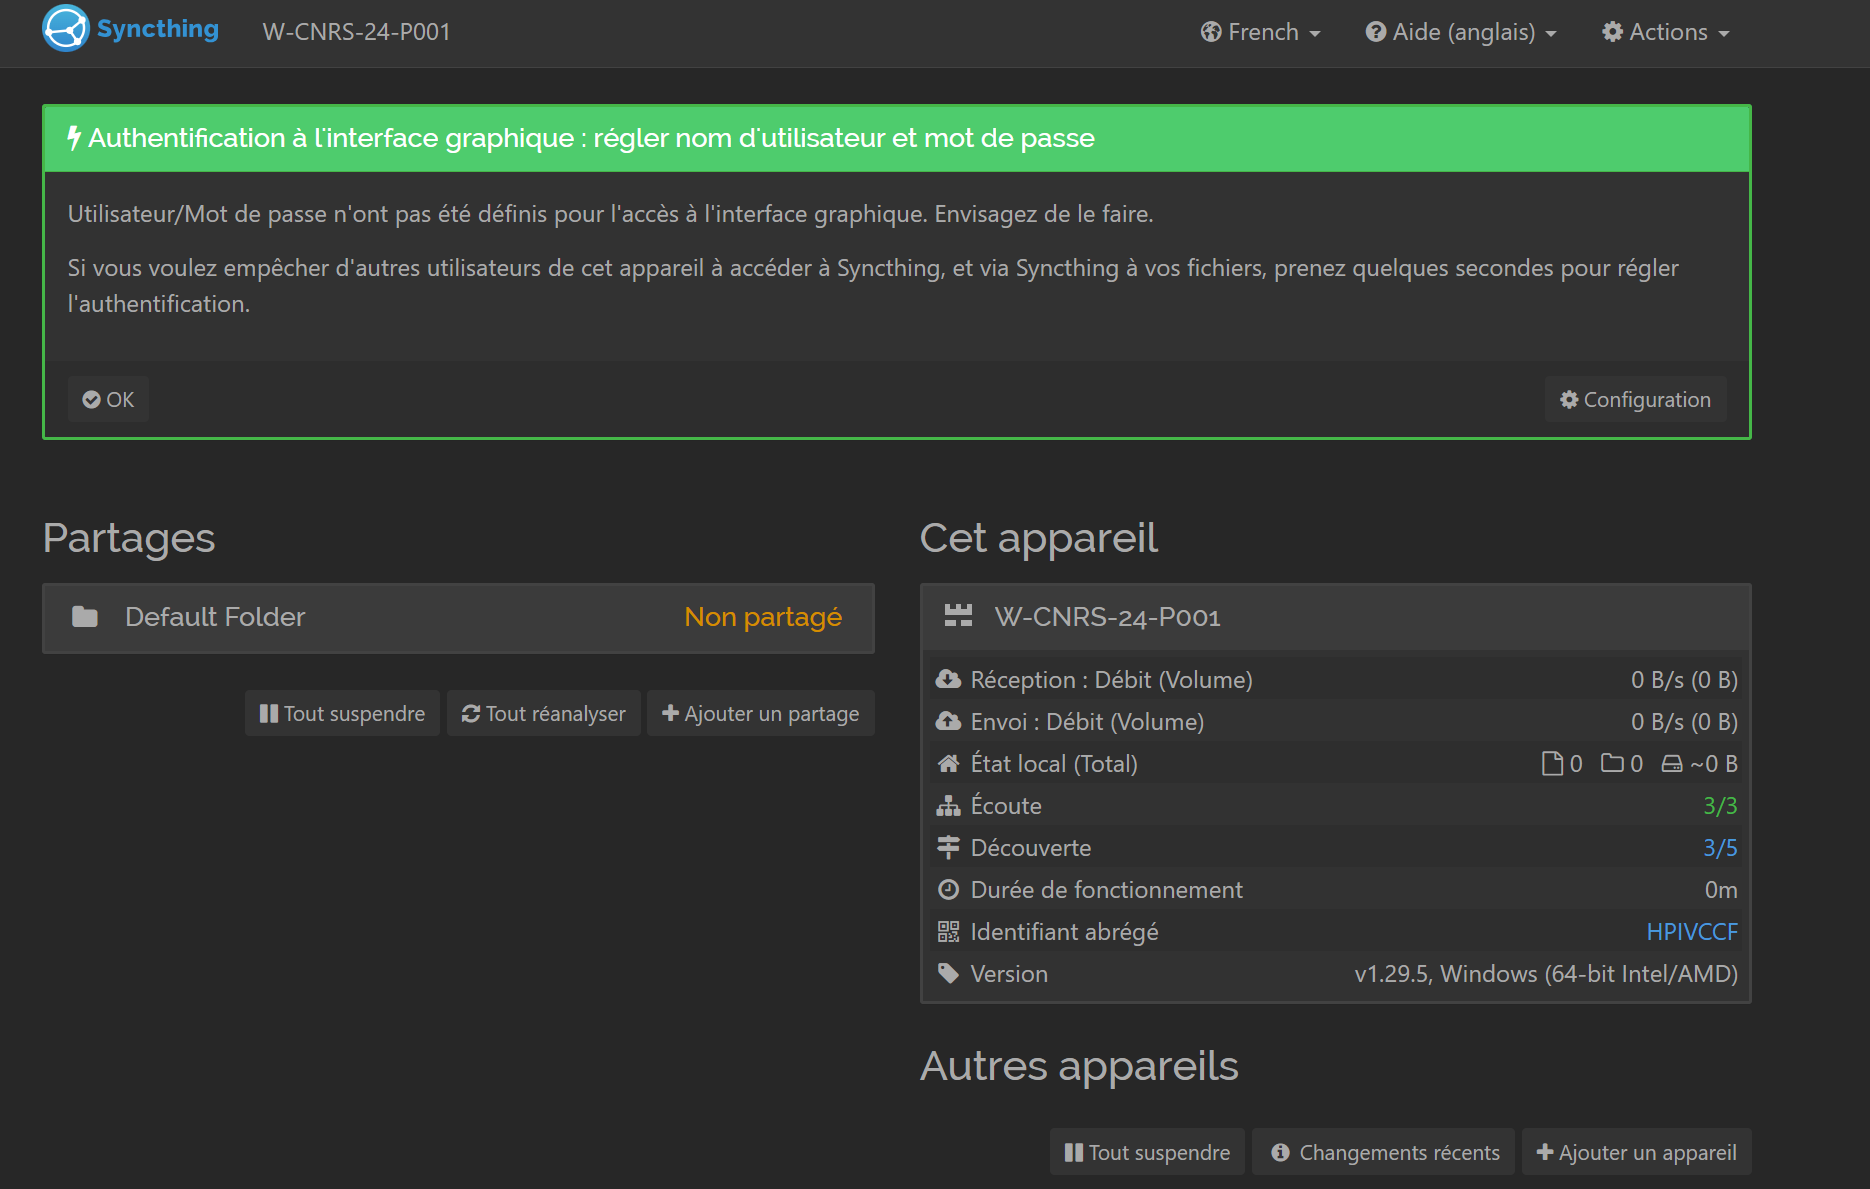
Once installed, you should see the main application window (figure 30). You can access it via your browser at 127.0.0.1:8384 (if you left these settings untouched during installation) or by clicking on the “Syncthing Configuration Page” shortcut added to your desktop. Depending on your browser, it may inform you that the page you wish to display (127.0.0.1) presents a probable security risk. You can override this warning and display the page anyway (via, for example, the “Advanced” button and something like “Continue to page”).
On this first page, the application may advise you to add a username and password to access the interface. From a security point of view, this is a plus, but for the sake of accessibility and assuming that your computer is locked with a password and that you don’t leave your workstation unlocked, we won’t be configuring authenticated access.
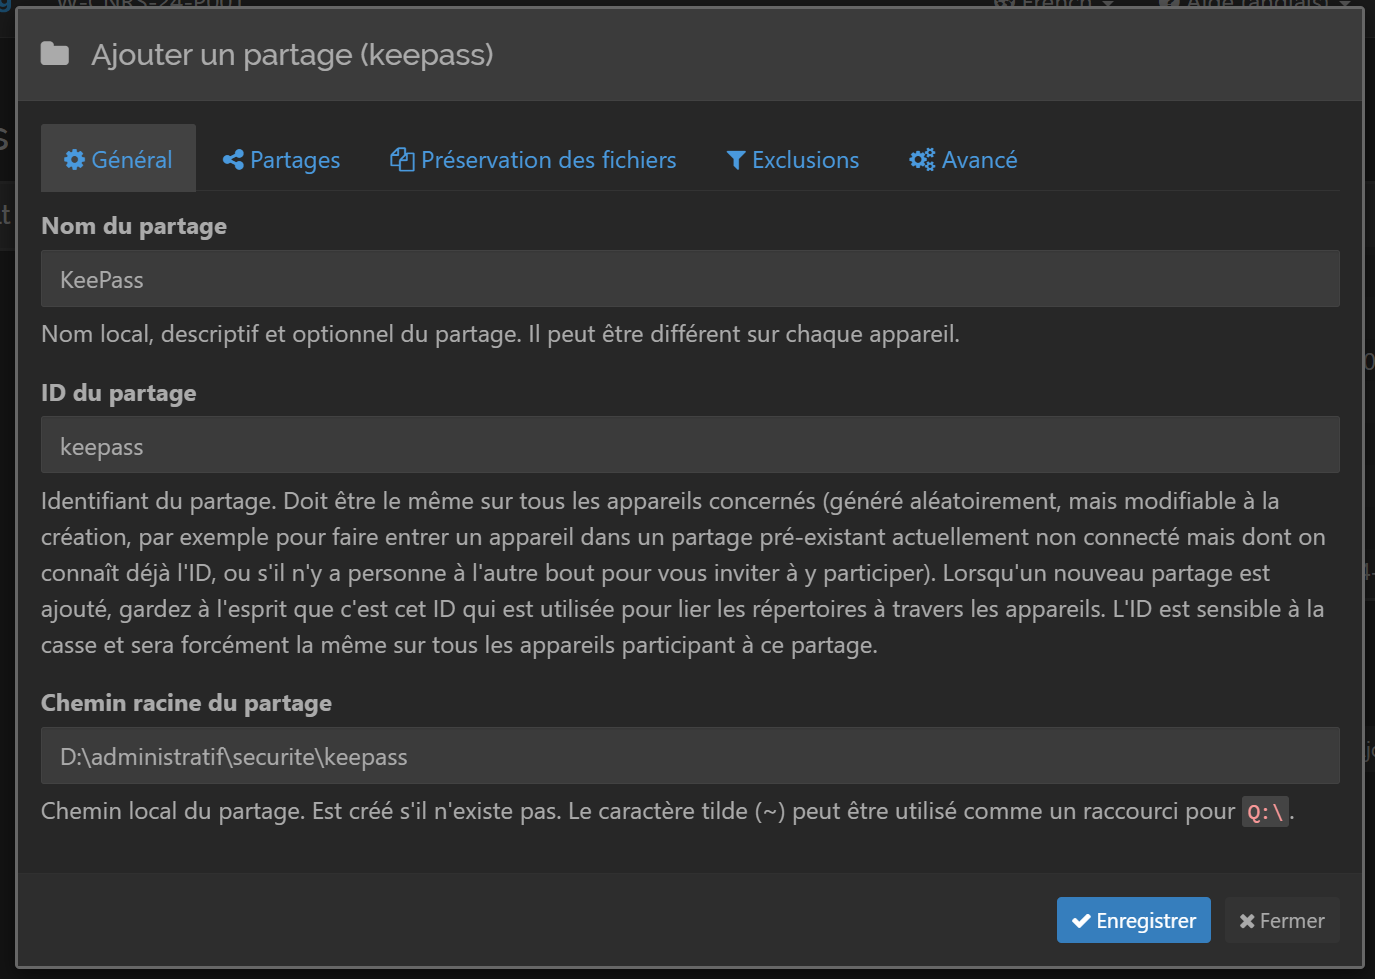
Now that our software is installed, the next step is to add a share folder that will contain our KeePassXC database. To do this, simply click on the “Add a share” button on the home screen. On the configuration screen (figure 31), we’re going to give it a name (it may be different between devices), as well as a share ID (it must be IDENTICAL between devices) and finally the share path, which in this case will be the location of the folder where my database is stored.
4.3 - Installing and configuring the Syncthing client on Android
To configure Syncthing on our Android smartphone, we’re going to retrieve the application directly from the store. Make sure you get the right one, called “Syncthing-Fork”.
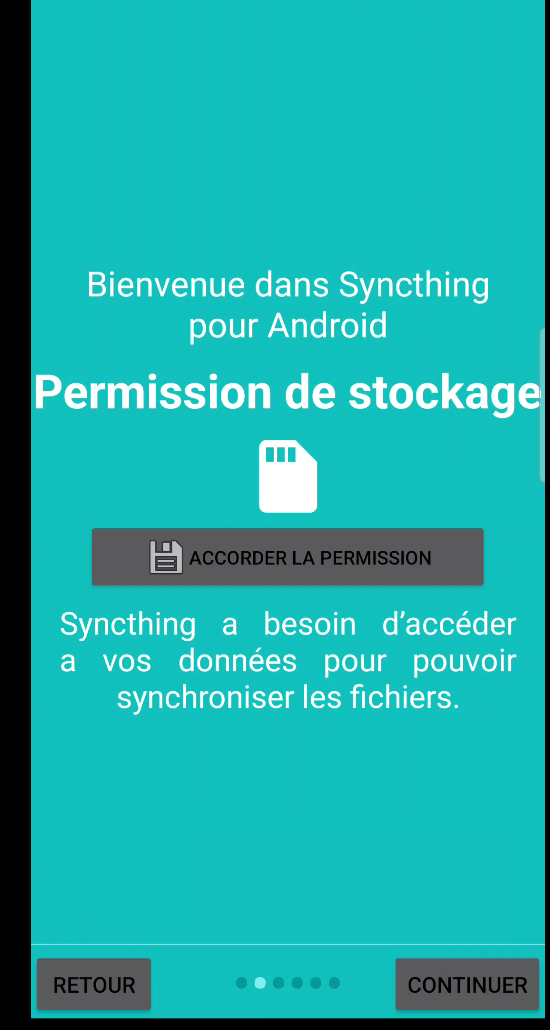
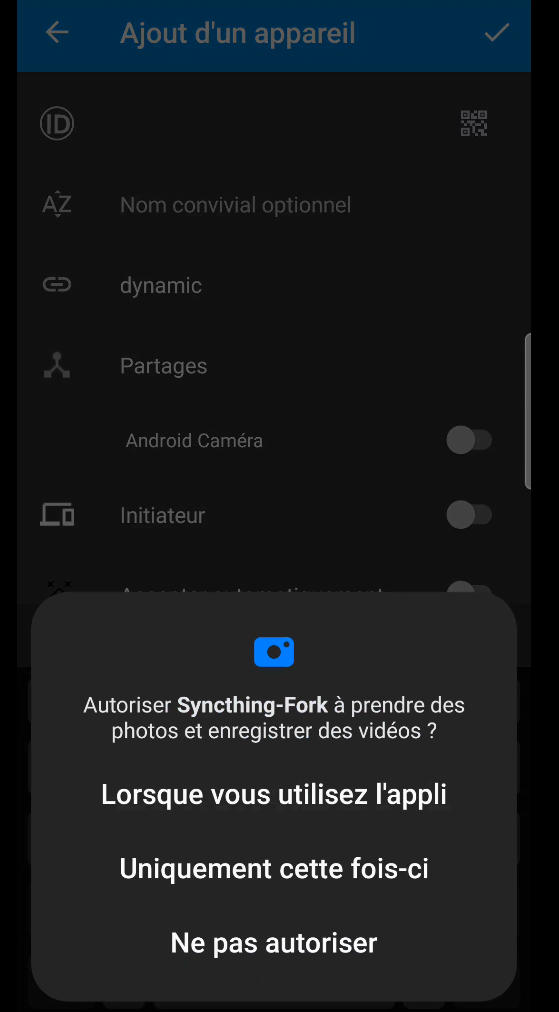
When you launch the application, you must authorize it to access several elements of your phone:
- storage access, which will give it access to your database stored locally on your phone (figure 32)
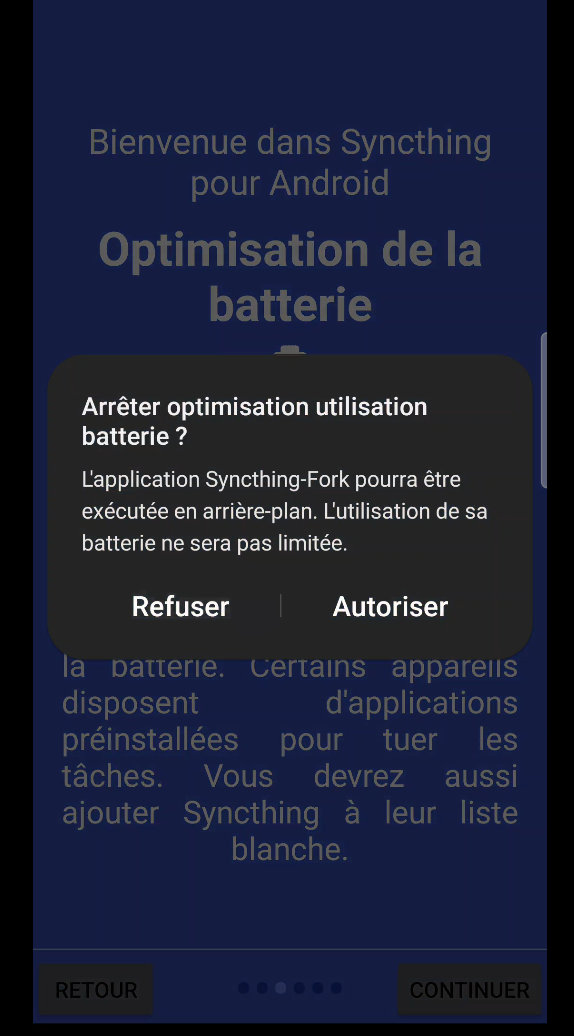
- regarding battery optimization, it’s advisable to stop battery optimization (figure 33). Here we need our phone not to automatically close the application, for example if it stays open longer than a “basic” application. It should be noted, however, that theoretically, disabling battery optimization could have an impact on battery life. Of course, this will have to be taken into account via other variables, such as the spacing between synchronizations or the type of connection (via mobile data or wifi, for example) but for the moment via my demanding usage example (synchronization still functional via mobile data), the impact in my opinion is not a significance on my battery life.
- for location permissions, it is also advisable to grant them (figure 34). As indicated in the comments, localization will only be used for wifi network selection, if you wish to perform synchronizations only on predefined wifi networks (your home network, for example).
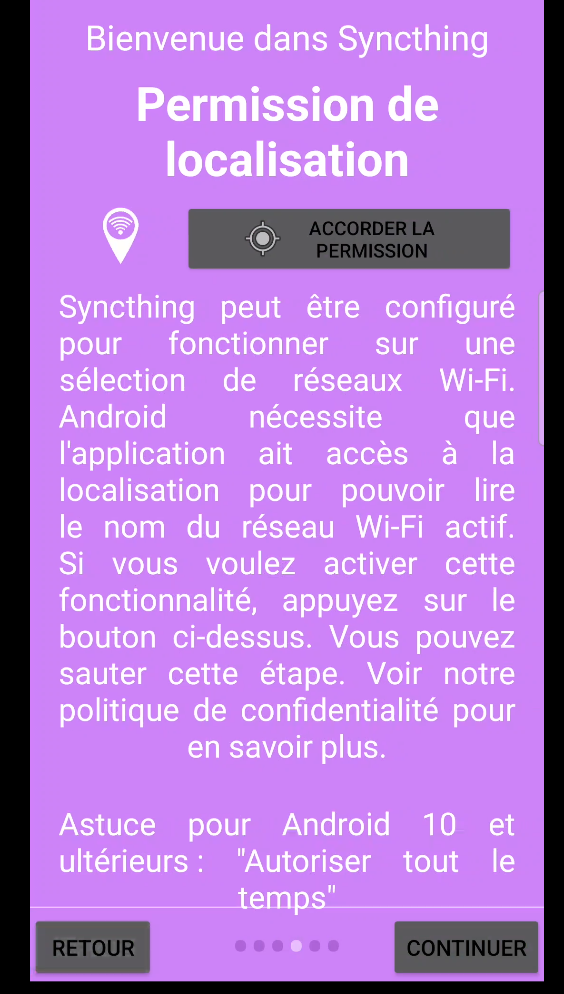
- finally, also enable application notifications (figure 35) so that the application can inform you of synchronization details.

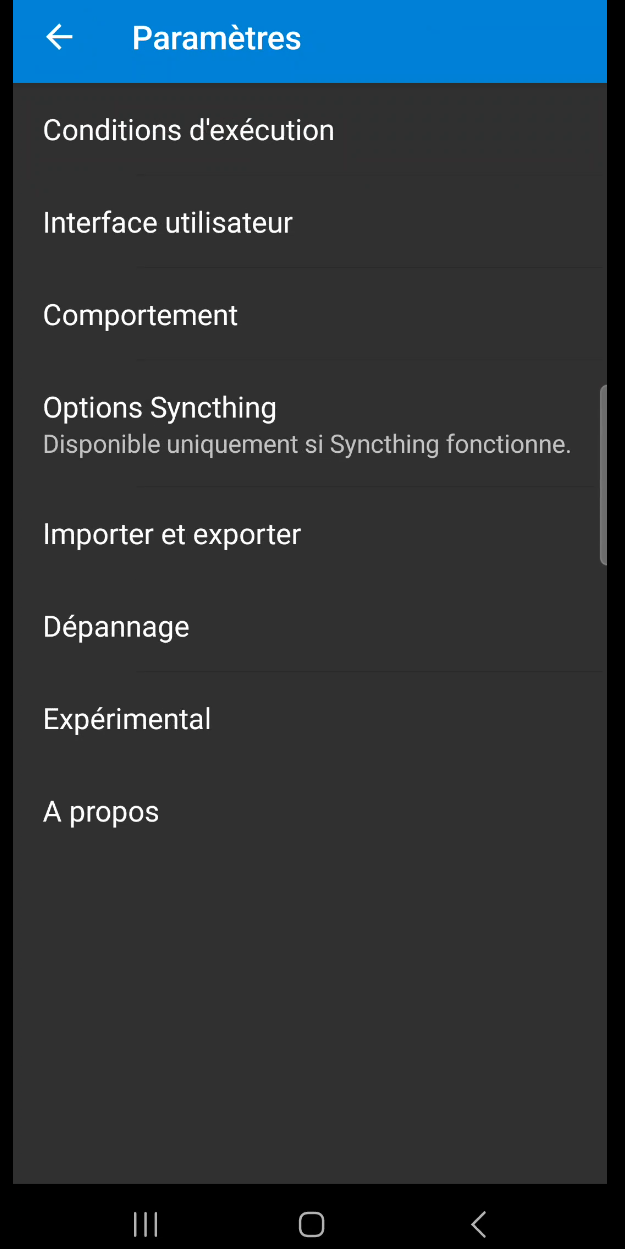
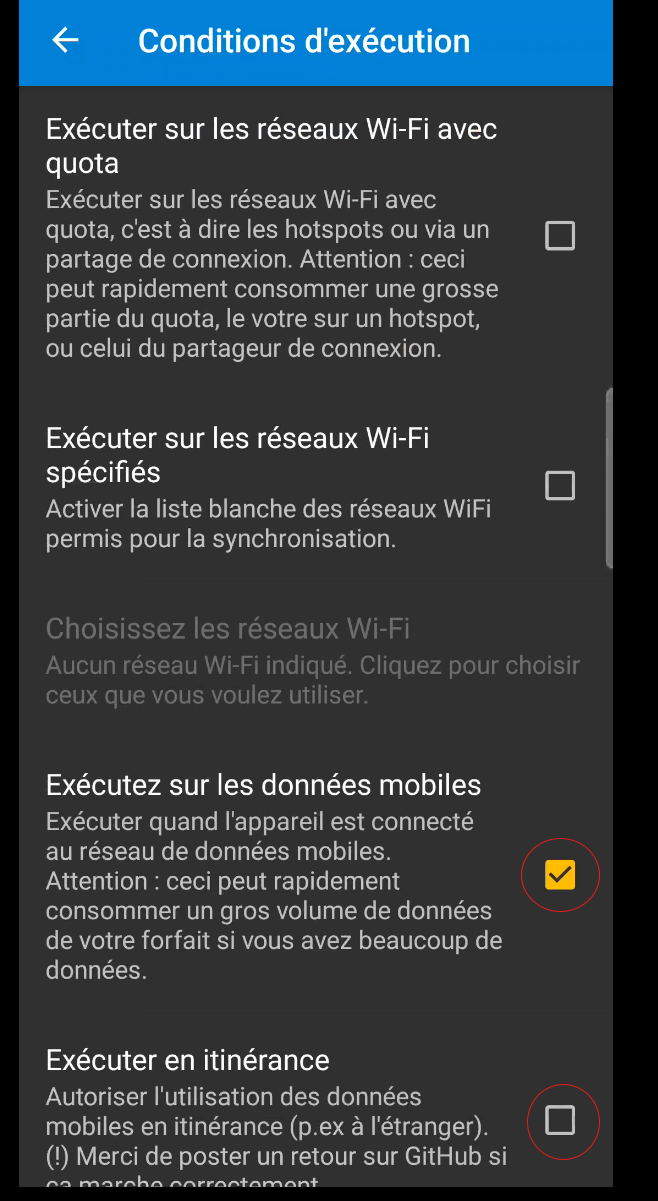
Now that the application is correctly installed, by default the conditions for executing synchronizations are set to take place over wifi only. For my personal use, and in order to test my synchronization processes directly, I chose to activate the synchronization executor from mobile data (via 4G or 5G, for example). You’re free to do that too (bearing in mind the impact it can have on battery life, but above all on your mobile plan), but in any case I leave “Run while roaming” unchecked so that synchronization doesn’t take place when I’m abroad, for example, where mobile data can be deducted significantly from my plan (the software will go into standby mode at that point). To configure this simply go to the “Settings” tab via the 3 bars at the top left, click on “Execution conditions” (figure 36), then check/uncheck the corresponding boxes (figure 37).
Still in the application settings, it would be a good idea to check the “Autostart” box (figure 38) in the “Behavior” section, so that it automatically launches the synchronization process as soon as the phone is switched on.

4.4 - Pairing a computer with an Android phone
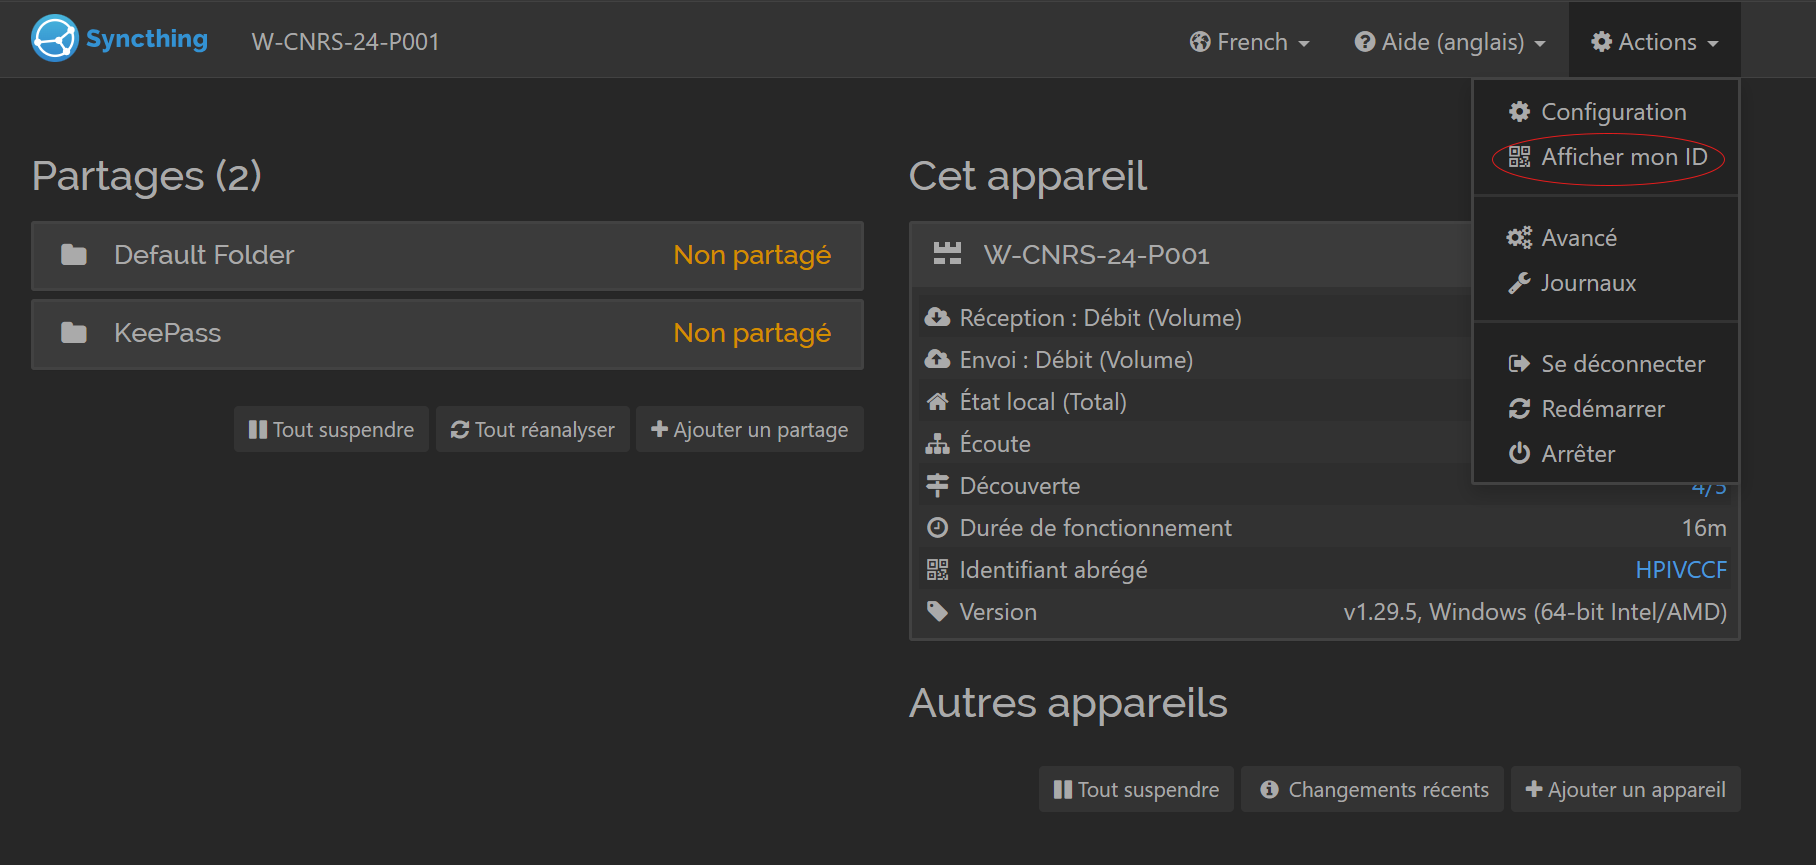
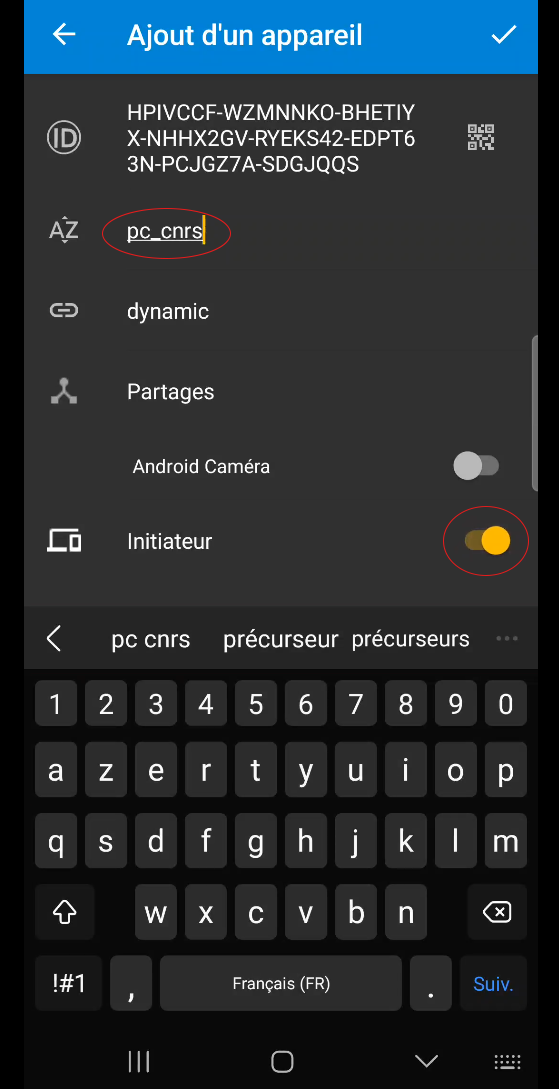
L’application correctement installée et configurée sur notre ordinateur et notre téléphone, il nous reste maintenant à appareiller nos appareils. The easiest way to do this is to use QR codes for identification. On your computer where we have configured Syncthing (section 4.2), open the configuration window (default address 127.0.0.1:8384 or “Syncthing Configuration Page” shortcut on the desktop) and click on the “Actions” tab, then on “Show my ID” (figure 39).
Return to the Syncthing application on your phone, click on the “DEVICES” tab and then on the top-right button with a + to add a new device. In the new window, click on the QR code icon in the top right-hand corner, and allow the application to access your camera (figure 40).
Give this device a name (here I’ve chosen “pc_cnrs”) and check the “Initiator” box (figure 41).
Now you should see an add request on your computer’s configuration page (figure 42).
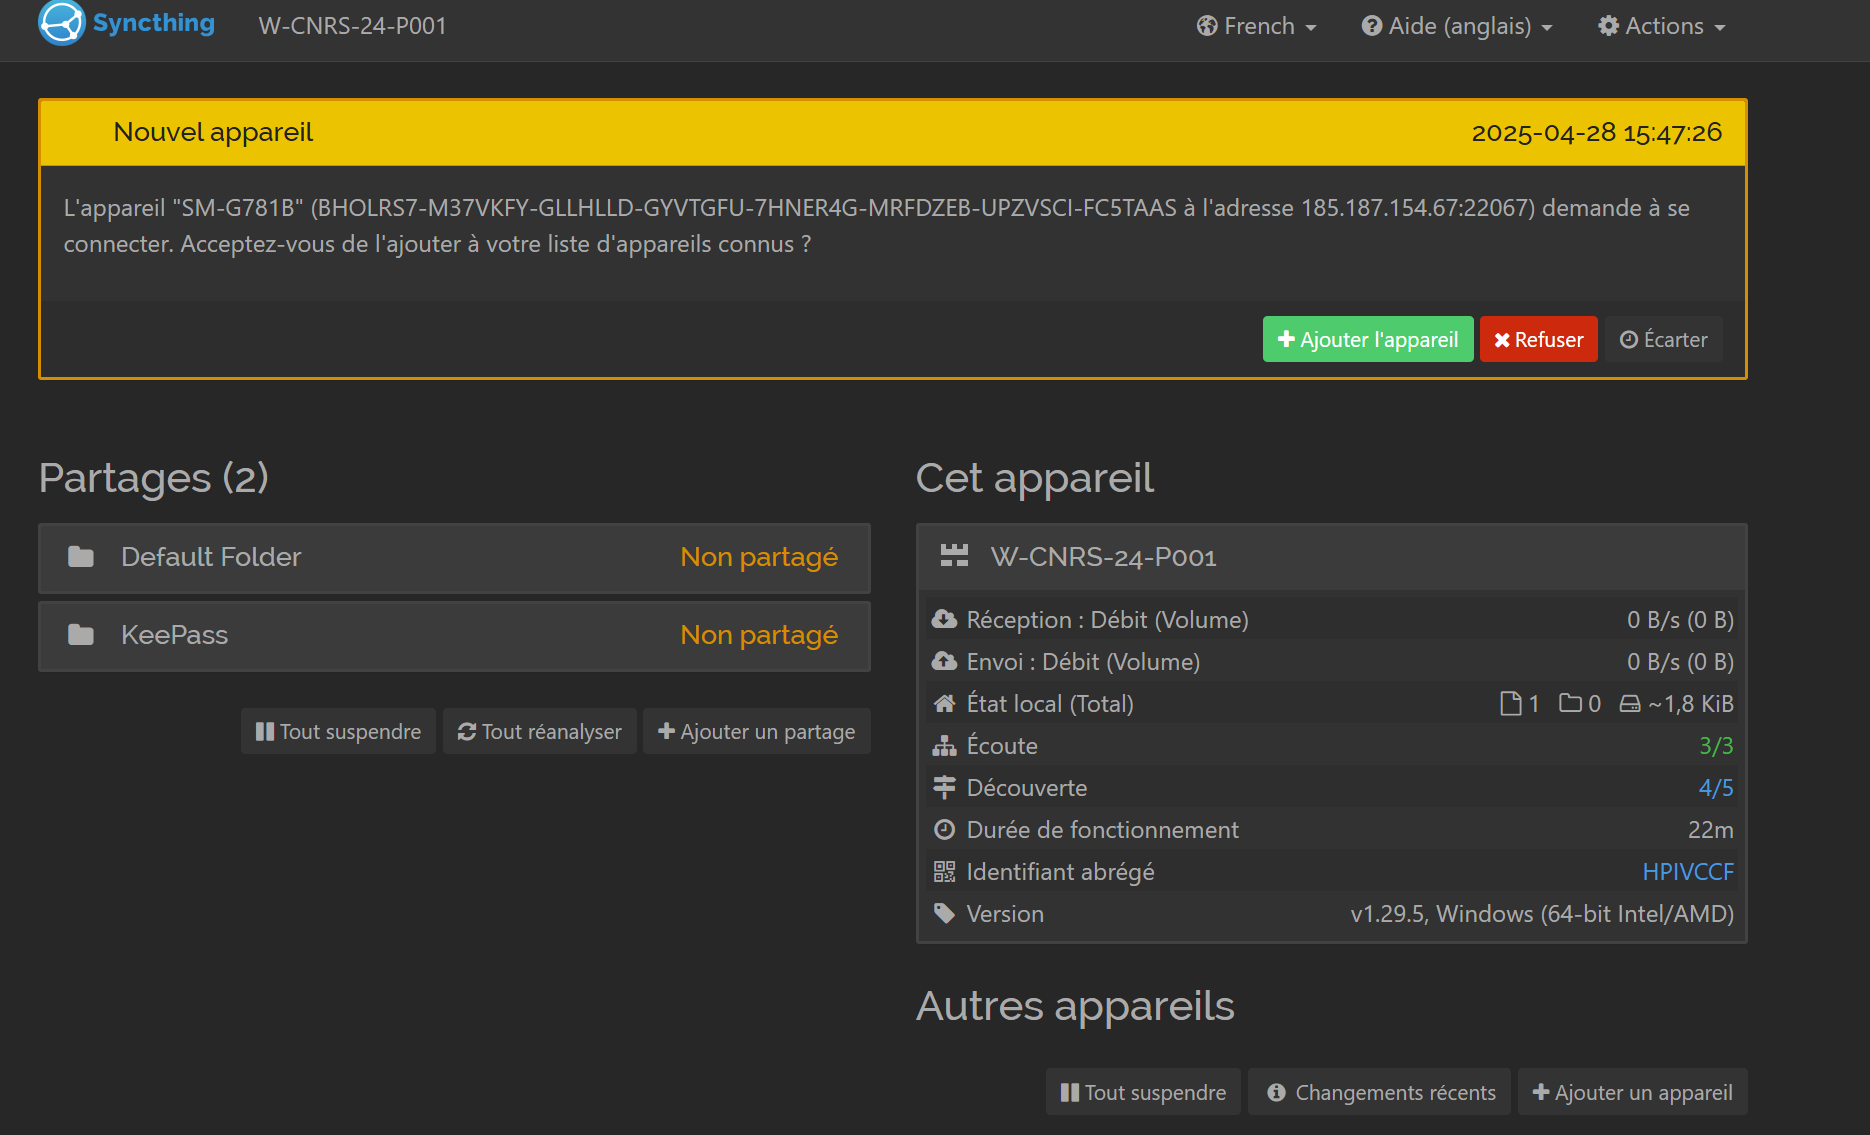
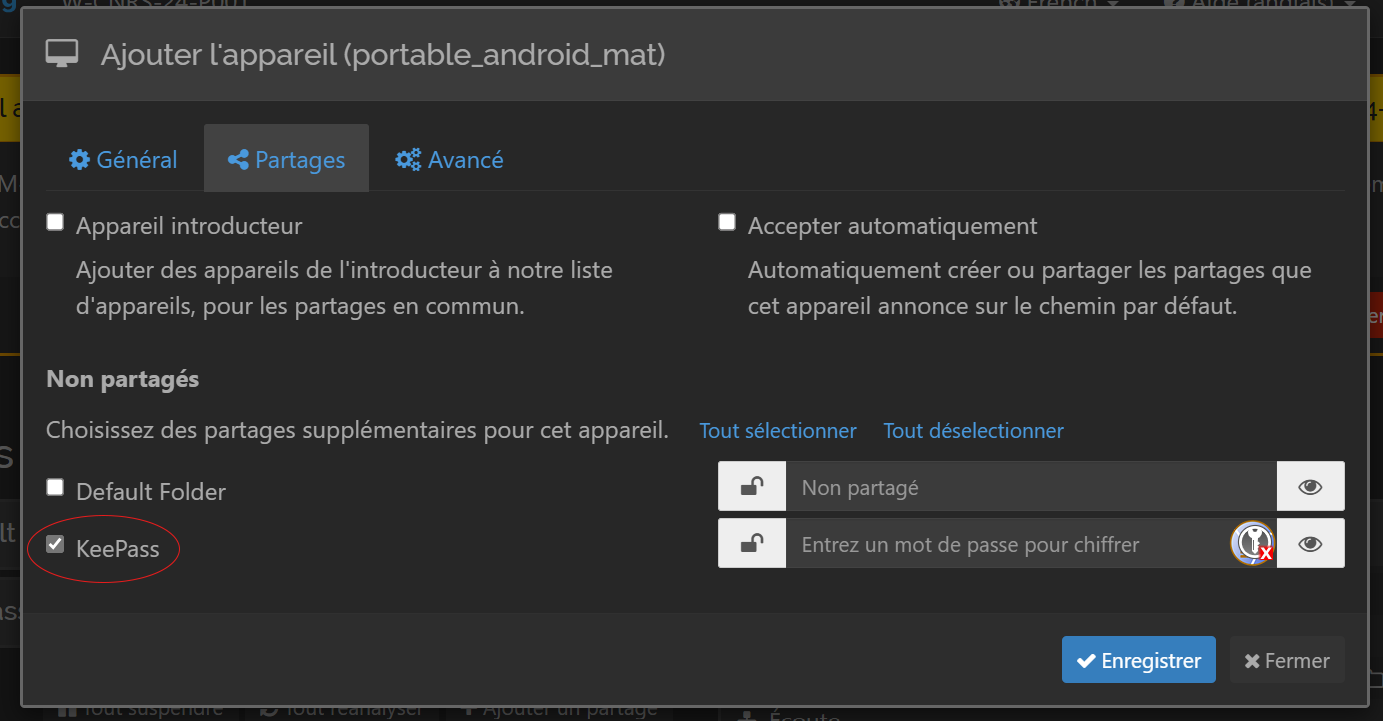
Accept it by clicking on “Add device”. In the “General” tab, give it a friendly name (for my example, it will be “portable_android_mat”, figure 43).
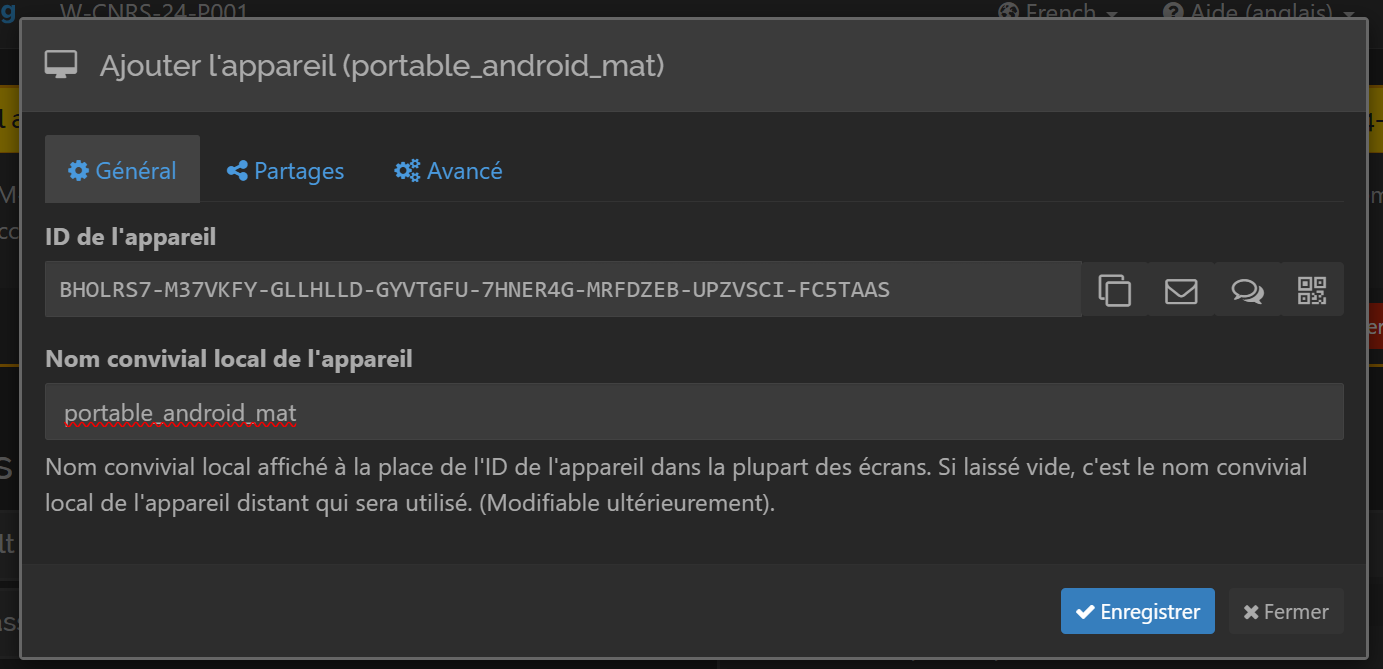
Then click on the “Shares” tab and check the box corresponding to the share folder we created earlier (figure 44).
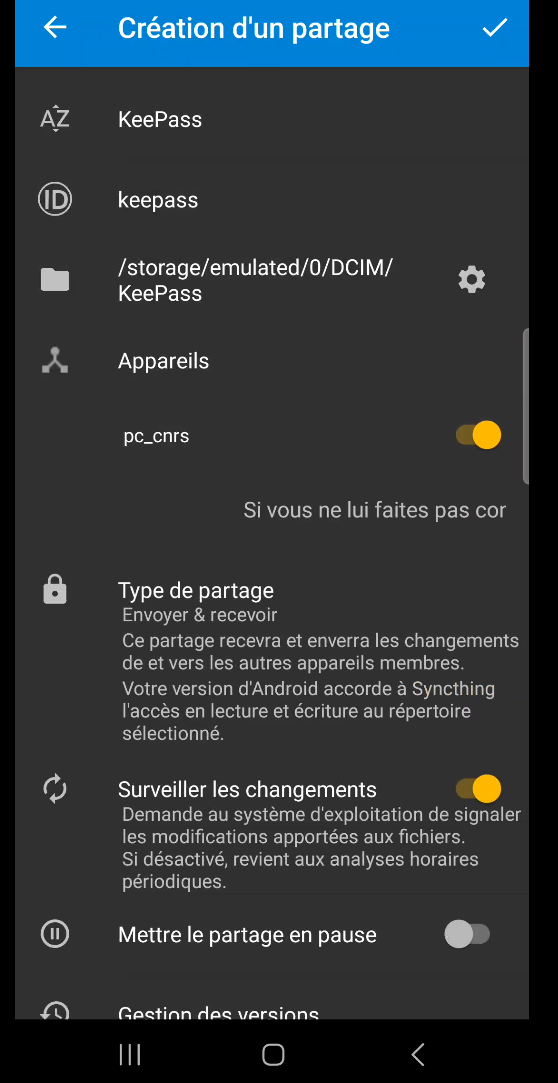
Now, in the same way as on our computer (section 4.2), we need to create a shared folder containing our database on our phone. To do this, return to our phone, click on the “SHARES” tab, create a new share using the + button in the top right-hand corner, and configure the parameters. Please note :
- as before, you can give it any name you like (here it’s “KeePass”),
- likewise, you must enter the same identifier as your shared folder on your computer. In my case, it’s “keepass”,
- you need to enter a location on your phone where your database will be stored. To do this, click on the little cogwheel. For my example and personal configuration, I’ll be in the “/storage/emulated/0/DCIM/KeePass” folder (I’ve created the “KeePass” folder with the little + at top right),
- I’ve activated sharing with the “pc_cnrs” device, which is the pc I paired previously.
- then validate with the icon at top right.
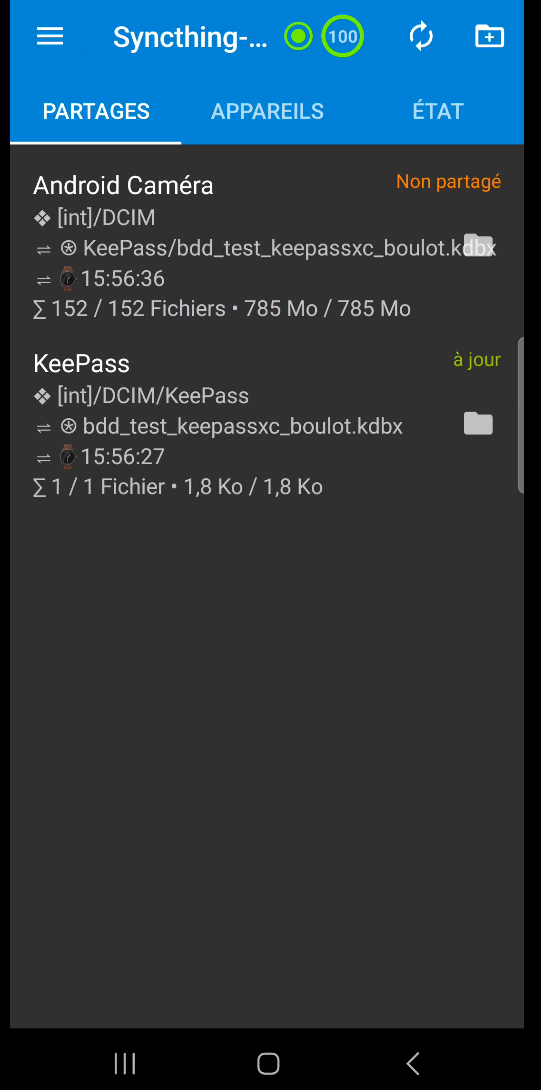
For your information, you should have a configuration like figure 45.
Congratulations, you should be able to pair and synchronize your folders (figure 46 and figure 47).
4.5 - Pairing two computers
This section is a bonus, but can be useful, for example, if you want to synchronize your database with two computers, one at your workplace and the second at home, for telecommuting.
Now that you’ve synchronized a computer and a cell phone, this step is child’s play:
- install and configure the Synchting client under Windows on your second computer (section 4.2). Don’t forget that the share ID must be identical to the one set on the other computer and by association with your cell phone (in my example it will be “keepass”),
- repeat the step in section 4.5 with the second computer.
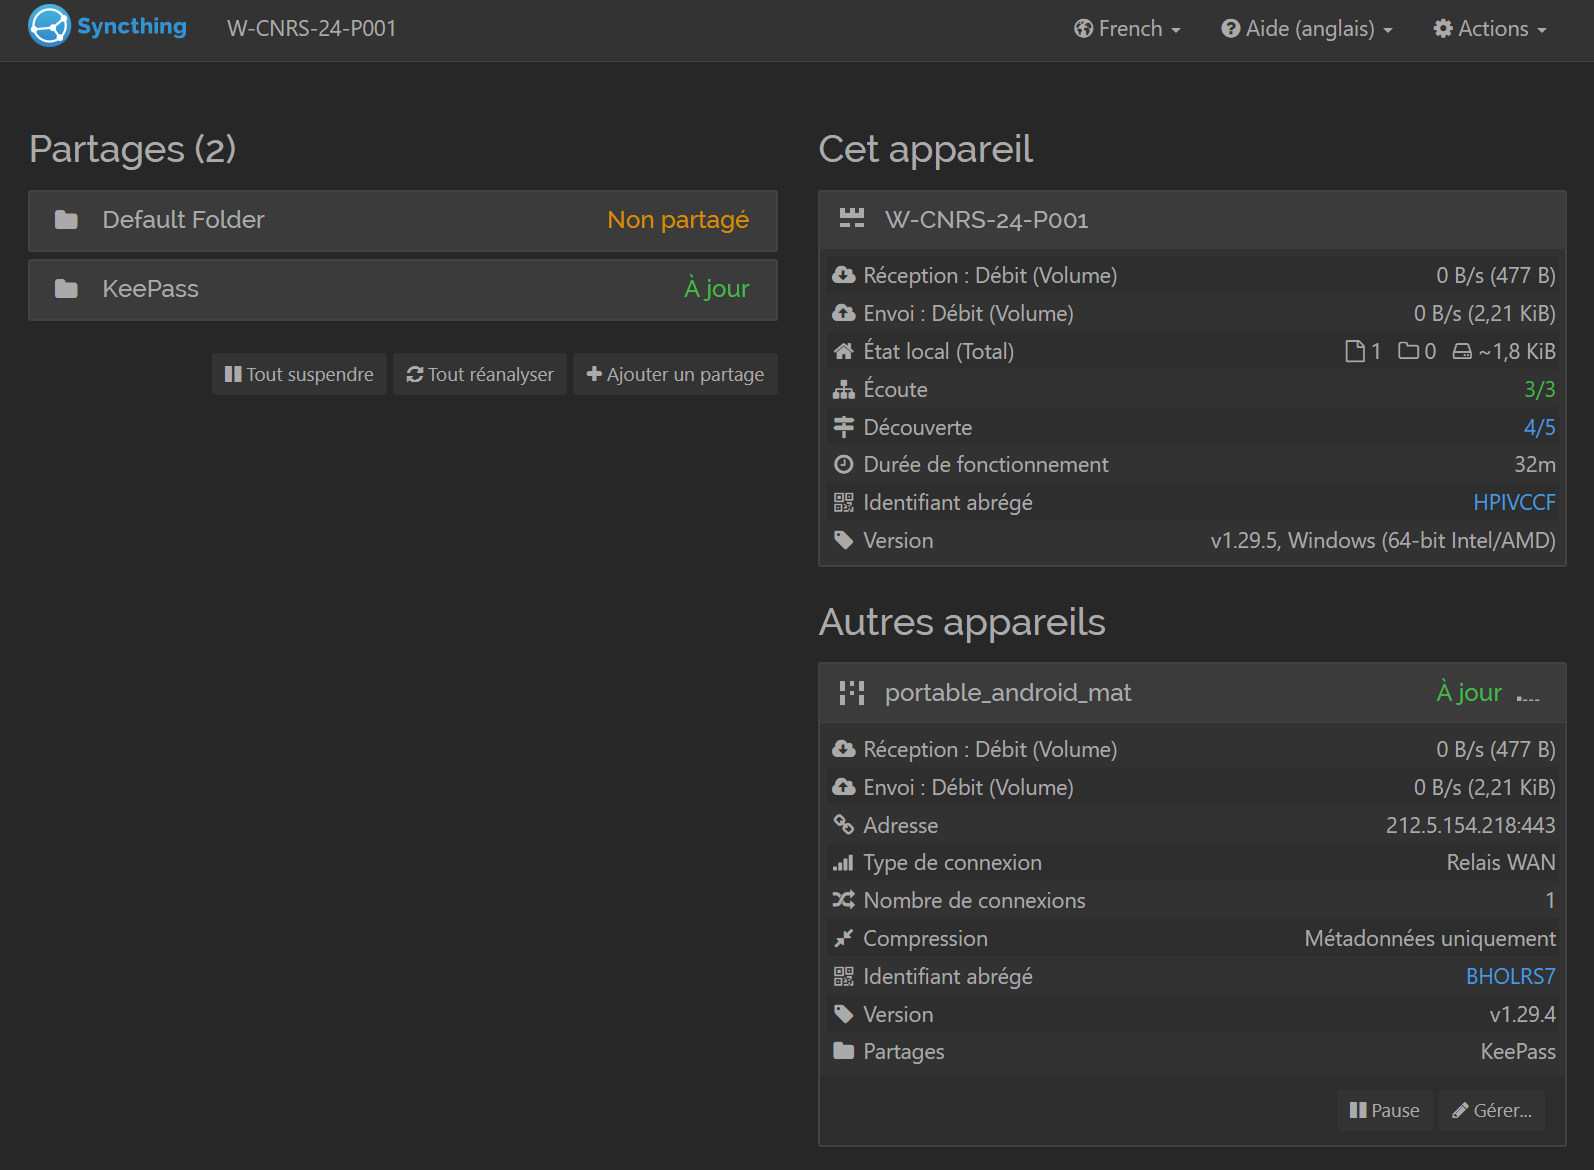
Once you’ve done this, you should see your second device next to the first (figure 48).

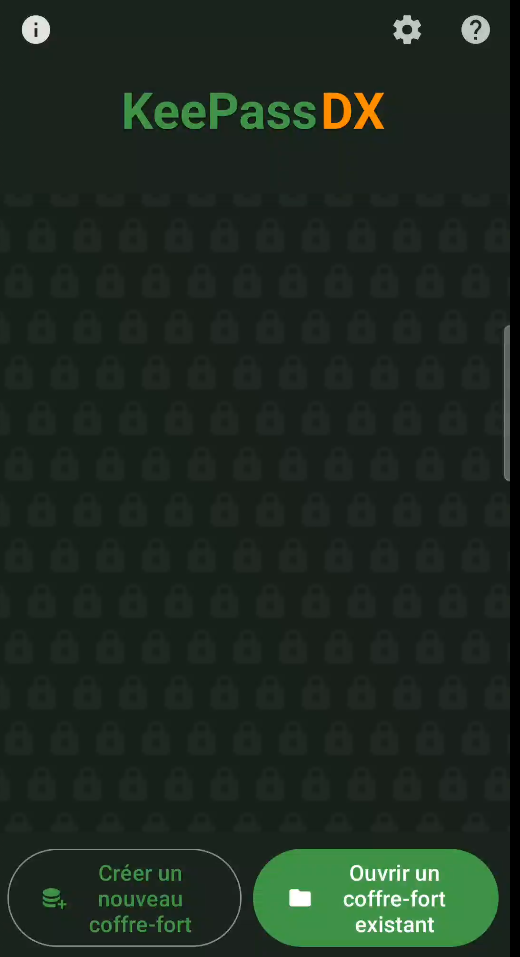
5 - Installing the KeePass application on Android
First of all, congratulations on getting this far, you’ve done the hard part. In this last section, we’re going to install an Android application on our phone that will enable us to access our database on the phone, and also make it easier for us to fill in passwords on websites (same principle as in section 3 for our computer).
In concrete terms, you can choose between :
- KeePassDX et KeePass2Android for Android,
- Strongbox and KeePassium for iOS.
In our example, I’m going to use KeePassDX, which I think has the advantage of a slightly nicer interface than KeePass2Android.
5.1 - Installing and configuring the KeePassDX application
Once you’ve installed the KeePassDX app on your Android phone, you should get this first window (figure 49).
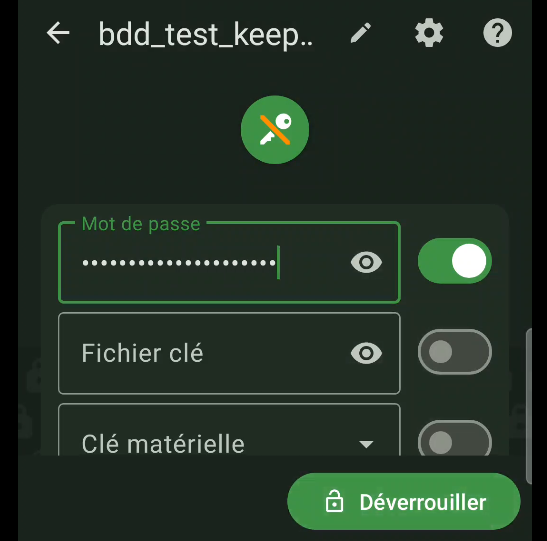
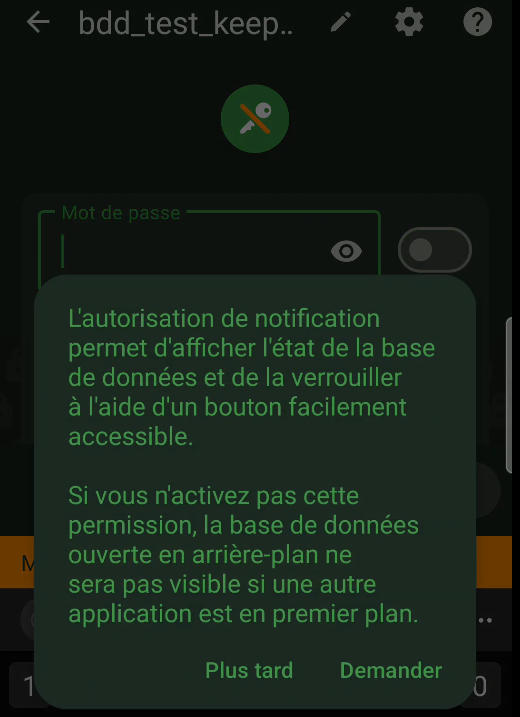
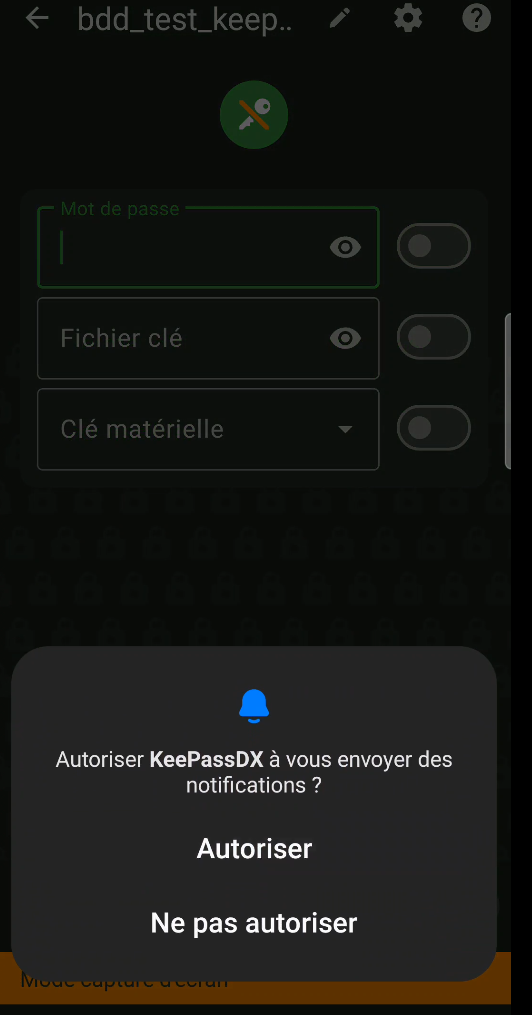
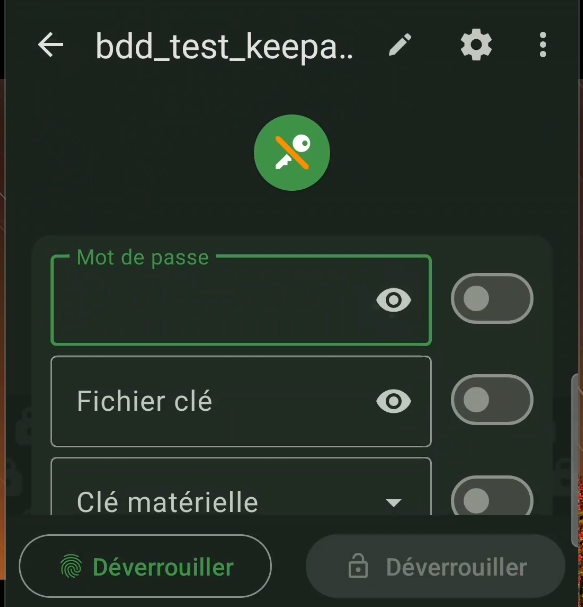
Simply click on the “Open an existing safe” tab and select your database. In my example, you’ll find it in the “/storage/emulated/0/DCIM/KeePass” folder. Enter your password (figure 50) and accept the notification authorization (figure 51 et 52).
Congratulations! You now have access to your database. Just a word of warning: check your phone’s notifications pane to make sure your database is locked if you no longer need it. By default, it should lock automatically on certain actions (such as locking the screen), but this will depend on your settings.
Before we head off for a coffee, we’ve just got a few configurations to make to the application to simplify our interactions with it.
A good idea is to enable biometric unlocking of the application, which will allow us to unlock it using our fingerprint, for example, instead of our password. To do this, go to the application settings (click on the 3 bars at the top left, then on the “Settings” tab), section “Device unlocking” then check the boxes “Biometric unlocking” and “Open in.. automatically”. (figure 53). The next time you connect to the base, you’ll be asked for your password once again, and all you have to do is click on “Link with device unlock” at the bottom (figure 54) to complete the biometric association (figure 55).
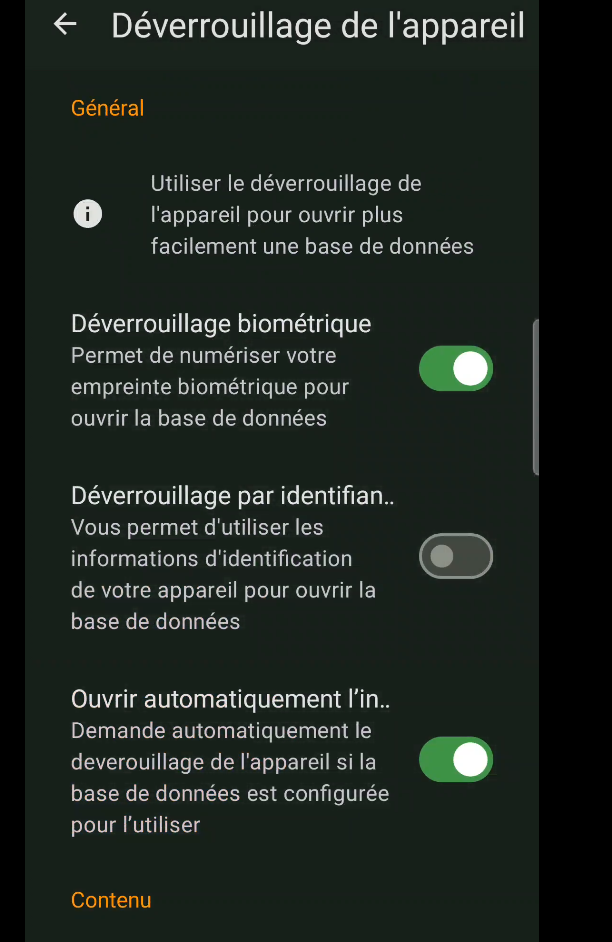

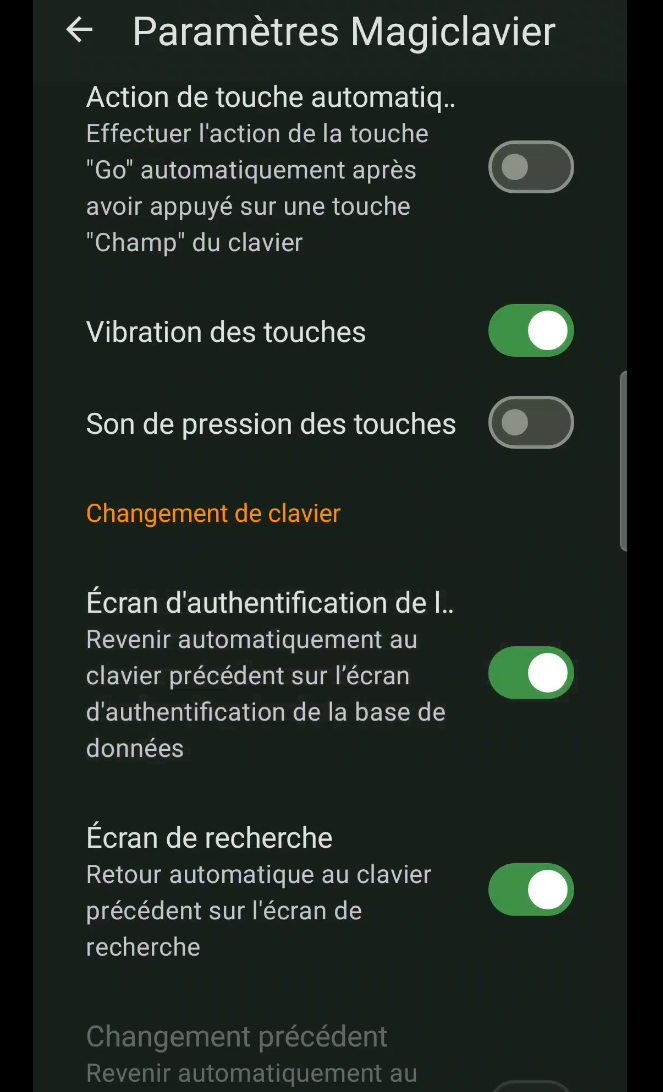
The second interesting option is the activation of the “Magiclavier”, which will greatly assist the automatic filling of website fields from our phone. To activate it, go once again to Settings, but in the “Form filling” tab. In this section, click on “Device keyboard settings”, select the authorization for the “Magic keyboard (KeePassDX)”, go back and in the “Magic keyboard settings” section, check the “Authentication screen” box in the “Keyboard change” sub-section. (figure 56).
Now, when you get to a site where you have to fill in your credentials, you can change your keyboard using the button at the bottom right of your keyboard. (figure 57), this will give you access to a menu connected to your database, making it easier to fill in the required fields. (figure 58).